HP LaserJet Pro MFP 4101-4104dw User Guide 1 - Page 157
Check the send-fax resolution settings, Check the Error Correction Mode setting
 |
View all HP LaserJet Pro MFP 4101-4104dw manuals
Add to My Manuals
Save this manual to your list of manuals |
Page 157 highlights
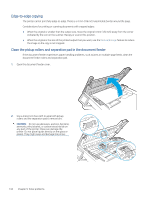
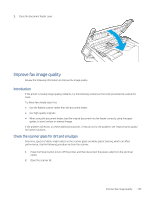
3. Clean the scanner glass and the white plastic backing underneath the scanner lid with a soft cloth or sponge that has been moistened with nonabrasive glass cleaner. CAUTION: Do not use abrasives, acetone, benzene, ammonia, ethyl alcohol, or carbon tetrachloride on any part of the printer; these can damage the printer. Do not place liquids directly on the glass or platen. They might seep and damage the printer. 4. Dry the glass and white plastic parts with a chamois or a cellulose sponge to prevent spotting. 5. Connect the power cable to an outlet, and then press the Power button to turn on the printer. Check the send-fax resolution settings If the printer was unable to send a fax because the receiving fax machine did not answer or was busy, the printer attempts to redial based on the redial-on-busy, redial-on-no-answer, and redial-on-communication-error options. 1. From the Home screen on the printer control panel, swipe right and touch the Fax icon. 2. Touch Send Now, and then touch the Settings icon . 3. Touch Resolution, and then touch the desired setting. Try the Standard resolution setting if the fax will not send with a higher resolution. Check the Error Correction Mode setting Usually, the printer monitors the signals on the telephone line while it is sending or receiving a fax. If the printer detects an error during the transmission and the Error Correction Mode setting is On, the printer can request that the portion of the fax be resent. The factory-set default for error correction is On. You should turn off error correction only if you are having trouble sending or receiving a fax, and you are willing to accept the errors in the transmission. Turning off the setting might be useful when you are trying to send a fax overseas or receive one from overseas, or if you are using a satellite telephone connection. 1. From the Home screen on the printer control panel, swipe right and then touch the Fax icon. 2. Swipe right and touch the Setup icon. 3. Touch Preferences. 4. Scroll to Error Correction Mode and then touch the button to turn the setting off or on. Send to a different fax machine Try sending the fax to a different fax machine. If the fax quality is better, the problem is related to the initial recipient's fax machine settings or supplies status. Check the sender's fax machine Ask the sender to try sending from a different fax machine. If the fax quality is better, the problem is with the sender's fax machine. If a different fax machine is unavailable, ask the sender to consider making the following changes: ● Make sure the original document is on white (not colored) paper. ● Increase the fax resolution, quality level, or contrast settings. 146 Chapter 9 Solve problems
-
 1
1 -
2
-
3
-
4
-
5
-
6
-
7
-
8
-
9
-
10
-
11
-
12
-
13
-
14
-
15
-
16
-
17
-
18
-
19
-
20
-
21
-
22
-
23
-
24
-
25
-
26
-
27
-
28
-
29
-
30
-
31
-
32
-
33
-
34
-
35
-
36
-
37
-
38
-
39
-
40
-
41
-
42
-
43
-
44
-
45
-
46
-
47
-
48
-
49
-
50
-
51
-
52
-
53
-
54
-
55
-
56
-
57
-
58
-
59
-
60
-
61
-
62
-
63
-
64
-
65
-
66
-
67
-
68
-
69
-
70
-
71
-
72
-
73
-
74
-
75
-
76
-
77
-
78
-
79
-
80
-
81
-
82
-
83
-
84
-
85
-
86
-
87
-
88
-
89
-
90
-
91
-
92
-
93
-
94
-
95
-
96
-
97
-
98
-
99
-
100
-
101
-
102
-
103
-
104
-
105
-
106
-
107
-
108
-
109
-
110
-
111
-
112
-
113
-
114
-
115
-
116
-
117
-
118
-
119
-
120
-
121
-
122
-
123
-
124
-
125
-
126
-
127
-
128
-
129
-
130
-
131
-
132
-
133
-
134
-
135
-
136
-
137
-
138
-
139
-
140
-
141
-
142
-
143
-
144
-
145
-
146
-
147
-
148
-
149
-
150
-
151
-
 152
152 -
 153
153 -
 154
154 -
 155
155 -
 156
156 -
 157
157 -
 158
158 -
 159
159 -
 160
160 -
 161
161 -
 162
162 -
163
-
164
-
165
-
166
-
167
-
168
-
169
-
170
-
171
-
172
-
173
-
174
-
175
-
176
-
177
-
178
-
179
-
180
-
181
-
182
-
183
-
184
-
185
-
186
-
187
-
188
-
189
-
190
-
191
-
192
-
193
-
194
-
195
-
196
-
197
-
198
-
199
-
200
-
201
-
202
-
203
-
204
-
205
 |
 |