HP Nc4000 Maintenance and Service Guide: HP Compaq Notebook nc4000 Series - Page 78
Hard Drive, Spare Part Number Information, Use the bezel to slide the hard drive forward
 |
View all HP Nc4000 manuals
Add to My Manuals
Save this manual to your list of manuals |
Page 78 highlights
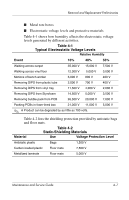
Removal and Replacement Procedures 60 GB 40 GB 30 GB Hard Drive Spare Part Number Information 325524-001 325523-001 325522-001 4. Remove the hard drive by following these steps: a. Turn the notebook bottom side up with the left side facing forward. b. Remove the PM2.5×3.0 screw 1 that secures the hard drive to the notebook. c. Separate the hard drive bezel 2. d. Use the bezel to slide the hard drive forward 3 to unseat the hard drive connector from the system board. e. Remove the hard drive. Removing the Hard Drive Reverse the above procedure to install the hard drive. Maintenance and Service Guide 5-5
-
 1
1 -
2
-
3
-
4
-
5
-
6
-
7
-
8
-
9
-
10
-
11
-
12
-
13
-
14
-
15
-
16
-
17
-
18
-
19
-
20
-
21
-
22
-
23
-
24
-
25
-
26
-
27
-
28
-
29
-
30
-
31
-
32
-
33
-
34
-
35
-
36
-
37
-
38
-
39
-
40
-
41
-
42
-
43
-
44
-
45
-
46
-
47
-
48
-
49
-
50
-
51
-
52
-
53
-
54
-
55
-
56
-
57
-
58
-
59
-
60
-
61
-
62
-
63
-
64
-
65
-
66
-
67
-
68
-
69
-
70
-
71
-
72
-
 73
73 -
 74
74 -
 75
75 -
 76
76 -
 77
77 -
 78
78 -
 79
79 -
 80
80 -
 81
81 -
 82
82 -
 83
83 -
84
-
85
-
86
-
87
-
88
-
89
-
90
-
91
-
92
-
93
-
94
-
95
-
96
-
97
-
98
-
99
-
100
-
101
-
102
-
103
-
104
-
105
-
106
-
107
-
108
-
109
-
110
-
111
-
112
-
113
-
114
-
115
-
116
-
117
-
118
-
119
-
120
-
121
-
122
-
123
-
124
-
125
-
126
-
127
-
128
-
129
-
130
-
131
-
132
-
133
-
134
-
135
-
136
-
137
-
138
-
139
-
140
-
141
-
142
-
143
-
144
-
145
-
146
-
147
-
148
-
149
-
150
-
151
-
152
-
153
-
154
-
155
-
156
-
157
-
158
-
159
-
160
-
161
-
162
-
163
-
164
-
165
-
166
-
167
 |
 |

Removal and Replacement Procedures
Maintenance and Service Guide
5–5
4. Remove the hard drive by following these steps:
a.
Turn the notebook bottom side up with the left side
facing forward.
b.
Remove the PM2.5×3.0 screw
1
that secures the
hard drive to the notebook.
c.
Separate the hard drive bezel
2
.
d.
Use the bezel to slide the hard drive forward
3
to unseat
the hard drive connector from the system board.
e.
Remove the hard drive.
Removing the Hard Drive
Reverse the above procedure to install the hard drive.
Hard Drive
Spare Part Number Information
60 GB
40 GB
30 GB
325524-001
325523-001
325522-001