HP Nc4000 Maintenance and Service Guide: HP Compaq Notebook nc4000 Series - Page 80
Remove the two Torx T5 M2.5×4.5 screws, Remove the hard drive from the hard drive frame
 |
View all HP Nc4000 manuals
Add to My Manuals
Save this manual to your list of manuals |
Page 80 highlights
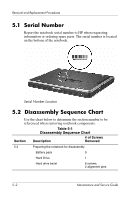
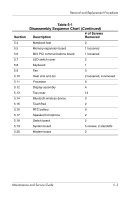
Removal and Replacement Procedures c. Remove the two Torx T5 M2.5×4.5 screws 1 and the two PM2.5×3.5 screws 2 that secure the hard drive to the hard drive frame. d. Use a 4.0-mm socket to remove the two M2.0×10.0 alignment pins 3 from the back of the hard drive. e. Remove the hard drive from the hard drive frame 4. Removing the Hard Drive from the Hard Drive Frame f. Remove the two PM2.0×3.0 screws 1 that secure the hard drive upper bezel to the hard drive frame. g. Remove the upper bezel from the frame 2. Removing the Hard Drive Upper Bezel Maintenance and Service Guide 5-7
-
 1
1 -
2
-
3
-
4
-
5
-
6
-
7
-
8
-
9
-
10
-
11
-
12
-
13
-
14
-
15
-
16
-
17
-
18
-
19
-
20
-
21
-
22
-
23
-
24
-
25
-
26
-
27
-
28
-
29
-
30
-
31
-
32
-
33
-
34
-
35
-
36
-
37
-
38
-
39
-
40
-
41
-
42
-
43
-
44
-
45
-
46
-
47
-
48
-
49
-
50
-
51
-
52
-
53
-
54
-
55
-
56
-
57
-
58
-
59
-
60
-
61
-
62
-
63
-
64
-
65
-
66
-
67
-
68
-
69
-
70
-
71
-
72
-
73
-
74
-
 75
75 -
 76
76 -
 77
77 -
 78
78 -
 79
79 -
 80
80 -
 81
81 -
 82
82 -
 83
83 -
 84
84 -
 85
85 -
86
-
87
-
88
-
89
-
90
-
91
-
92
-
93
-
94
-
95
-
96
-
97
-
98
-
99
-
100
-
101
-
102
-
103
-
104
-
105
-
106
-
107
-
108
-
109
-
110
-
111
-
112
-
113
-
114
-
115
-
116
-
117
-
118
-
119
-
120
-
121
-
122
-
123
-
124
-
125
-
126
-
127
-
128
-
129
-
130
-
131
-
132
-
133
-
134
-
135
-
136
-
137
-
138
-
139
-
140
-
141
-
142
-
143
-
144
-
145
-
146
-
147
-
148
-
149
-
150
-
151
-
152
-
153
-
154
-
155
-
156
-
157
-
158
-
159
-
160
-
161
-
162
-
163
-
164
-
165
-
166
-
167
 |
 |

Removal and Replacement Procedures
Maintenance and Service Guide
5–7
c.
Remove the two Torx T5 M2.5×4.5 screws
1
and the two
PM2.5×3.5 screws
2
that secure the hard drive to the
hard drive frame.
d.
Use a 4.0-mm socket to remove the two M2.0×10.0
alignment pins
3
from the back of the hard drive.
e.
Remove the hard drive from the hard drive frame
4
.
Removing the Hard Drive from the Hard Drive Frame
f.
Remove the two PM2.0×3.0 screws
1
that secure the
hard drive upper bezel to the hard drive frame.
g.
Remove the upper bezel from the frame
2
.
Removing the Hard Drive Upper Bezel