HP Network Scanjet 5 HP Network ScanJet 5 Scanner - User's Guide - Page 57
Changing the Display Size of an Item, Panning an Item, Inverting an Image
 |
View all HP Network Scanjet 5 manuals
Add to My Manuals
Save this manual to your list of manuals |
Page 57 highlights
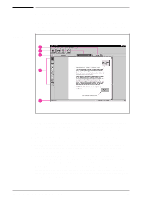
Changing the Display Size of an Item Use the Zoom Navigator or Zoom commands from the View menu to zoom in and display the details of a page, or zoom out and make the page smaller on the screen while in Page View. The page magnification is shown in the status bar in Page View. Use any of the following methods to change the display size: • From the View menu, choose Zoom In or Zoom Out. • Click the plus (+) or minus (-) magnifying glass on the Zoom Navigator. • From the View menu, choose Actual Size or click Actual Size on the Zoom Navigator to view the page at its actual size (100%). • From the View menu, choose Fit to Window to enlarge or reduce an item to fit the entire item into the Page View window. Panning an Item Panning an item is a quick way to scroll through an item in Page View when the entire item is not visible on the screen. To pan an item 1 Display the item in Page View. 2 Click Pan on the Annotation Tool Bar. 3 Place the pointer on the item. The pointer changes to a hand. 4 Press the mouse button and drag up, down, right, or left. The area of the page you are viewing changes as you drag the pointer. The Pan tool remains active until you deselect it or view a different item. Inverting an Image This feature allows you to change an item from black-on-white to white-on-black. To invert an image 1 Display the item in Page View. 2 Choose Invert from the Page menu. The image is reversed from black-on-white to white-on-black. Gray shades are reversed as well. Repeat these steps to change the image back to its original appearance. PaperPort 4 Software EN Working in the PaperPort Software 57
-
 1
1 -
2
-
3
-
4
-
5
-
6
-
7
-
8
-
9
-
10
-
11
-
12
-
13
-
14
-
15
-
16
-
17
-
18
-
19
-
20
-
21
-
22
-
23
-
24
-
25
-
26
-
27
-
28
-
29
-
30
-
31
-
32
-
33
-
34
-
35
-
36
-
37
-
38
-
39
-
40
-
41
-
42
-
43
-
44
-
45
-
46
-
47
-
48
-
49
-
50
-
51
-
 52
52 -
 53
53 -
 54
54 -
 55
55 -
 56
56 -
 57
57 -
 58
58 -
 59
59 -
 60
60 -
 61
61 -
 62
62 -
63
-
64
-
65
-
66
-
67
-
68
-
69
-
70
-
71
-
72
-
73
-
74
-
75
-
76
-
77
-
78
-
79
-
80
-
81
-
82
-
83
-
84
-
85
-
86
-
87
-
88
-
89
-
90
-
91
-
92
-
93
-
94
-
95
-
96
-
97
-
98
-
99
-
100
-
101
-
102
-
103
-
104
-
105
-
106
-
107
-
108
-
109
-
110
-
111
-
112
-
113
-
114
-
115
-
116
-
117
-
118
-
119
-
120
-
121
-
122
-
123
-
124
-
125
-
126
-
127
-
128
-
129
-
130
-
131
-
132
-
133
-
134
-
135
-
136
-
137
-
138
-
139
-
140
 |
 |