HP OMEN 15-ce100 Maintenance and Service Guide - Page 81
Reverse this procedure to install the webcam.
 |
View all HP OMEN 15-ce100 manuals
Add to My Manuals
Save this manual to your list of manuals |
Page 81 highlights
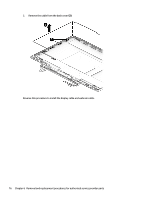
2. Remove the webcam board (2) from the display assembly. NOTE: Due to the adhesive located between the webcam board and the back cover, it may be necessary to move the webcam board from side to side to detach it. Reverse this procedure to install the webcam. Component replacement procedures 71
-
 1
1 -
2
-
3
-
4
-
5
-
6
-
7
-
8
-
9
-
10
-
11
-
12
-
13
-
14
-
15
-
16
-
17
-
18
-
19
-
20
-
21
-
22
-
23
-
24
-
25
-
26
-
27
-
28
-
29
-
30
-
31
-
32
-
33
-
34
-
35
-
36
-
37
-
38
-
39
-
40
-
41
-
42
-
43
-
44
-
45
-
46
-
47
-
48
-
49
-
50
-
51
-
52
-
53
-
54
-
55
-
56
-
57
-
58
-
59
-
60
-
61
-
62
-
63
-
64
-
65
-
66
-
67
-
68
-
69
-
70
-
71
-
72
-
73
-
74
-
75
-
 76
76 -
 77
77 -
 78
78 -
 79
79 -
 80
80 -
 81
81 -
 82
82 -
 83
83 -
 84
84 -
 85
85 -
 86
86 -
87
-
88
-
89
-
90
-
91
-
92
-
93
-
94
-
95
-
96
-
97
-
98
-
99
-
100
-
101
-
102
-
103
-
104
-
105
-
106
-
107
-
108
 |
 |

2.
Remove the webcam board
(2)
from the display assembly.
NOTE:
Due to the adhesive located between the webcam board and the back cover, it may be
necessary to move the webcam board from side to side to detach it.
Reverse this procedure to install the webcam.
Component replacement procedures
71