HP Officejet 100 User Guide - Page 37
Handle the ink cartridges
 |
View all HP Officejet 100 manuals
Add to My Manuals
Save this manual to your list of manuals |
Page 37 highlights
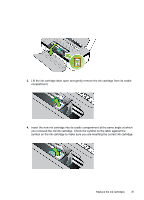
Handle the ink cartridges Before you replace or clean an ink cartridge, you should know the part names and how to handle the ink cartridges. 1 Copper-colored contacts 2 Plastic tape with pink pull tab (must be removed before installing) 3 Ink nozzles under tape Hold the ink cartridges by their black plastic sides, with the label on top. Do not touch the copper-colored contacts or the ink nozzles. NOTE: Handle the ink cartridges carefully. Dropping or jarring cartridges can cause temporary printing problems, or even permanent damage. Replace the ink cartridges Follow these instructions when the ink level is low. NOTE: When the ink level for an ink cartridge is low, a message appears on the display. You can also check the ink levels by using the printer Toolbox (Windows), the HP Utility (Mac OS X) or the Toolbox software for PDAs. For more information about using these tools, see Printer management tools. NOTE: Ink from the cartridges is used in the printing process in a number of different ways, including in the initialization process, which prepares the device and cartridges for printing. In addition, some residual ink is left in the cartridge after it is used. For more information see www.hp.com/go/inkusage. Replace the ink cartridges 33
-
 1
1 -
2
-
3
-
4
-
5
-
6
-
7
-
8
-
9
-
10
-
11
-
12
-
13
-
14
-
15
-
16
-
17
-
18
-
19
-
20
-
21
-
22
-
23
-
24
-
25
-
26
-
27
-
28
-
29
-
30
-
31
-
 32
32 -
 33
33 -
 34
34 -
 35
35 -
 36
36 -
 37
37 -
 38
38 -
 39
39 -
 40
40 -
 41
41 -
 42
42 -
43
-
44
-
45
-
46
-
47
-
48
-
49
-
50
-
51
-
52
-
53
-
54
-
55
-
56
-
57
-
58
-
59
-
60
-
61
-
62
-
63
-
64
-
65
-
66
-
67
-
68
-
69
-
70
-
71
-
72
-
73
-
74
-
75
-
76
-
77
-
78
-
79
-
80
-
81
-
82
-
83
-
84
-
85
-
86
-
87
-
88
-
89
-
90
-
91
-
92
-
93
-
94
-
95
-
96
-
97
-
98
-
99
-
100
-
101
-
102
-
103
-
104
-
105
-
106
-
107
-
108
-
109
-
110
-
111
-
112
-
113
-
114
-
115
-
116
-
117
-
118
 |
 |
