HP Officejet 150 User Guide - Page 57
Replace the ink cartridges, CAUTION - mobile all in one software
 |
View all HP Officejet 150 manuals
Add to My Manuals
Save this manual to your list of manuals |
Page 57 highlights
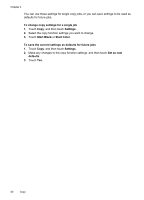
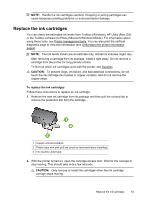
NOTE: Handle the ink cartridges carefully. Dropping or jarring cartridges can cause temporary printing problems, or even permanent damage. Replace the ink cartridges You can check the estimated ink levels from Toolbox (Windows), HP Utility (Mac OS), or the Toolbox software for PDAs (Microsoft Windows Mobile). For information about using these tools, see Printer management tools. You can also print the self-test diagnostic page to view this information (see Understand the printer information pages). NOTE: The ink levels shown are an estimate only. Actual ink volumes might vary. After removing a cartridge from its package, install it right away. Do not remove a cartridge from the printer for long periods of time. To find out which ink cartridges work with the printer, see Supplies. CAUTION: To prevent clogs, ink failure, and bad electrical connections, do not touch the ink cartridge ink nozzles or copper contacts, and do not remove the copper strips. To replace the ink cartridges Follow these instructions to replace an ink cartridge. 1. Remove the new ink cartridge from its package and then pull the colored tab to remove the protective film from the cartridge. 1 Copper-colored contacts 2 Plastic tape with pink pull tab (must be removed before installing) 3 Ink nozzles under tape 2. With the printer turned on, open the cartridge access door. Wait for the carriage to stop moving. This should take only a few seconds. CAUTION: Only remove or install ink cartridges when the ink cartridge carriage stops moving. Replace the ink cartridges 53
-
 1
1 -
2
-
3
-
4
-
5
-
6
-
7
-
8
-
9
-
10
-
11
-
12
-
13
-
14
-
15
-
16
-
17
-
18
-
19
-
20
-
21
-
22
-
23
-
24
-
25
-
26
-
27
-
28
-
29
-
30
-
31
-
32
-
33
-
34
-
35
-
36
-
37
-
38
-
39
-
40
-
41
-
42
-
43
-
44
-
45
-
46
-
47
-
48
-
49
-
50
-
51
-
 52
52 -
 53
53 -
 54
54 -
 55
55 -
 56
56 -
 57
57 -
 58
58 -
 59
59 -
 60
60 -
 61
61 -
 62
62 -
63
-
64
-
65
-
66
-
67
-
68
-
69
-
70
-
71
-
72
-
73
-
74
-
75
-
76
-
77
-
78
-
79
-
80
-
81
-
82
-
83
-
84
-
85
-
86
-
87
-
88
-
89
-
90
-
91
-
92
-
93
-
94
-
95
-
96
-
97
-
98
-
99
-
100
-
101
-
102
-
103
-
104
-
105
-
106
-
107
-
108
-
109
-
110
-
111
-
112
-
113
-
114
-
115
-
116
-
117
-
118
-
119
-
120
-
121
-
122
-
123
-
124
-
125
-
126
-
127
-
128
-
129
-
130
-
131
-
132
-
133
-
134
-
135
-
136
-
137
-
138
 |
 |