HP Officejet 150 User Guide - Page 61
To clean ink cartridges automatically, Clean the Print Cartridges
 |
View all HP Officejet 150 manuals
Add to My Manuals
Save this manual to your list of manuals |
Page 61 highlights
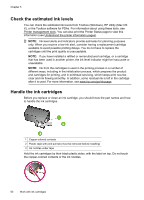
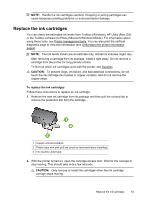
To clean ink cartridges automatically NOTE: Clean the ink cartridges only when print quality is poor. Cleaning uses ink and shortens the life of the ink cartridges. There are three levels of cleaning available. After one level of cleaning, perform the next level of cleaning only if the results are not satisfactory. Control panel 1. Touch right arrow , and then touch Setup. 2. Touch Tools, and then touch Clean Ink Cartridges. 3. Follow the onscreen instructions. Toolbox (Windows) 1. Open Toolbox. For more information, see Toolbox (Windows). 2. Click the Services tab, click Clean the Print Cartridges, and then follow the onscreen instructions. HP Utility (Mac OS X) 1. Open HP Utility. For more information, see HP Utility (Mac OS X). 2. Click Clean and follow the onscreen instructions. To clean ink cartridges manually Poor contact between the ink cartridges and the ink cartridge cradles can cause error messages or affect print quality. When this occurs, try cleaning the electrical contacts on the ink cartridges and ink cartridge cradles. NOTE: Before cleaning the ink cartridges manually, remove and reinsert the cartridges to make sure they are inserted correctly. 1. Turn on the device and open the front access cover. The print carriage moves to the center of the printer. 2. Wait until the print carriage is idle and silent, and then unplug the power cord from the back of the device. 3. Lift the ink cartridge latch open and gently remove the ink cartridge from its cradle compartment. 4. Inspect the ink cartridge contacts for ink and debris buildup. 5. Dip a clean foam rubber swab or lint-free cloth into distilled water, and squeeze any excess water from it. 6. Hold the ink cartridge by its sides. Ink cartridge maintenance 57
-
 1
1 -
2
-
3
-
4
-
5
-
6
-
7
-
8
-
9
-
10
-
11
-
12
-
13
-
14
-
15
-
16
-
17
-
18
-
19
-
20
-
21
-
22
-
23
-
24
-
25
-
26
-
27
-
28
-
29
-
30
-
31
-
32
-
33
-
34
-
35
-
36
-
37
-
38
-
39
-
40
-
41
-
42
-
43
-
44
-
45
-
46
-
47
-
48
-
49
-
50
-
51
-
52
-
53
-
54
-
55
-
 56
56 -
 57
57 -
 58
58 -
 59
59 -
 60
60 -
 61
61 -
 62
62 -
 63
63 -
 64
64 -
 65
65 -
 66
66 -
67
-
68
-
69
-
70
-
71
-
72
-
73
-
74
-
75
-
76
-
77
-
78
-
79
-
80
-
81
-
82
-
83
-
84
-
85
-
86
-
87
-
88
-
89
-
90
-
91
-
92
-
93
-
94
-
95
-
96
-
97
-
98
-
99
-
100
-
101
-
102
-
103
-
104
-
105
-
106
-
107
-
108
-
109
-
110
-
111
-
112
-
113
-
114
-
115
-
116
-
117
-
118
-
119
-
120
-
121
-
122
-
123
-
124
-
125
-
126
-
127
-
128
-
129
-
130
-
131
-
132
-
133
-
134
-
135
-
136
-
137
-
138
 |
 |
