HP P1006 Service Guide - Page 52
Covers, Front Cover, Control panel
 |
UPC - 883585164479
View all HP P1006 manuals
Add to My Manuals
Save this manual to your list of manuals |
Page 52 highlights
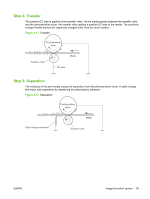
Covers Front Cover 1. Turn the device over so that it is resting on its back. 2. Using a flat-blade screwdriver, lift the plastic edges of the front cover out of their sockets (callout 1) and rotate the cover back. Figure 4-1 Remove front cover (1 of 1) Control panel 1. Remove the front cover. See Front Cover on page 40. 2. Remove control panel cover by prying up the leading edge, then sliding it towards the front of the printer and lifting it out. 40 Chapter 4 Removal and replacement ENWW
-
 1
1 -
2
-
3
-
4
-
5
-
6
-
7
-
8
-
9
-
10
-
11
-
12
-
13
-
14
-
15
-
16
-
17
-
18
-
19
-
20
-
21
-
22
-
23
-
24
-
25
-
26
-
27
-
28
-
29
-
30
-
31
-
32
-
33
-
34
-
35
-
36
-
37
-
38
-
39
-
40
-
41
-
42
-
43
-
44
-
45
-
46
-
 47
47 -
 48
48 -
 49
49 -
 50
50 -
 51
51 -
 52
52 -
 53
53 -
 54
54 -
 55
55 -
 56
56 -
 57
57 -
58
-
59
-
60
-
61
-
62
-
63
-
64
-
65
-
66
-
67
-
68
-
69
-
70
-
71
-
72
-
73
-
74
-
75
-
76
-
77
-
78
-
79
-
80
-
81
-
82
-
83
-
84
-
85
-
86
-
87
-
88
-
89
-
90
-
91
-
92
-
93
-
94
-
95
-
96
-
97
-
98
-
99
-
100
-
101
-
102
-
103
-
104
-
105
-
106
-
107
-
108
-
109
-
110
-
111
-
112
-
113
-
114
-
115
-
116
-
117
-
118
-
119
-
120
-
121
-
122
-
123
-
124
-
125
-
126
-
127
-
128
-
129
-
130
-
131
-
132
-
133
-
134
-
135
-
136
-
137
-
138
-
139
-
140
-
141
-
142
-
143
-
144
-
145
-
146
-
147
-
148
 |
 |

Covers
Front Cover
1.
Turn the device over so that it is resting on its back.
2.
Using a flat-blade screwdriver, lift the plastic edges of the front cover out of their sockets (callout
1) and rotate the cover back.
Figure 4-1
Remove front cover (1 of 1)
Control panel
1.
Remove the front cover. See
Front Cover
on page
40
.
2.
Remove control panel cover by prying up the leading edge, then sliding it towards the front of the
printer and lifting it out.
40
Chapter 4
Removal and replacement
ENWW