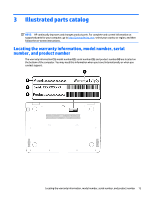
HP Pavilion 13-s000 Maintenance and Service Guide - Page 17
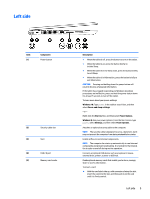
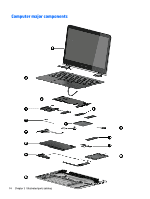
Left side
 |
View all HP Pavilion 13-s000 manuals
Add to My Manuals
Save this manual to your list of manuals |
Page 17 highlights
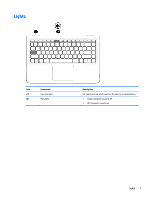
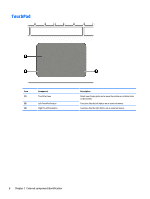
Left side Item Component (1) Power button (2) Security cable slot (3) Vent (4) USB 2.0 port (5) Memory card reader Description ● When the tablet is off, press the button to turn on the tablet. ● When the tablet is on, press the button briefly to initiate Sleep. ● When the tablet is in the Sleep state, press the button briefly to exit Sleep. ● When the tablet is in Hibernation, press the button briefly to exit Hibernation. CAUTION: Pressing and holding down the power button will result in the loss of unsaved information. If the tablet has stopped responding and Windows shutdown procedures are ineffective, press and hold the power button down for at least 5 seconds to turn off the tablet. To learn more about your power settings: Windows 10: Type power in the taskbar search box, and then select Power and sleep settings. - or - Right-click the Start button, and then select Power Options. Windows 8: See your power options. From the Start screen, type power, select Settings, and then select Power Options. Attaches an optional security cable to the computer. NOTE: The security cable is designed to act as a deterrent, but it may not prevent the computer from being mishandled or stolen. Enable airflow to cool internal components. NOTE: The computer fan starts up automatically to cool internal components and prevent overheating. It is normal for the internal fan to cycle on and off during routine operation. Connects an optional USB device, such as a keyboard, mouse, external drive, printer, scanner or USB hub. Reads optional memory cards that enable you to store, manage, share or access information. To insert a card: ▲ Hold the card label-side up, with connectors facing the slot, insert the card into the slot, and then push in on the card until it is firmly seated. Left side 9
-
 1
1 -
2
-
3
-
4
-
5
-
6
-
7
-
8
-
9
-
10
-
11
-
 12
12 -
 13
13 -
 14
14 -
 15
15 -
 16
16 -
 17
17 -
 18
18 -
 19
19 -
 20
20 -
 21
21 -
 22
22 -
23
-
24
-
25
-
26
-
27
-
28
-
29
-
30
-
31
-
32
-
33
-
34
-
35
-
36
-
37
-
38
-
39
-
40
-
41
-
42
-
43
-
44
-
45
-
46
-
47
-
48
-
49
-
50
-
51
-
52
-
53
-
54
-
55
-
56
-
57
-
58
-
59
-
60
-
61
-
62
-
63
-
64
-
65
-
66
-
67
-
68
-
69
-
70
-
71
-
72
-
73
-
74
-
75
-
76
-
77
-
78
-
79
-
80
-
81
-
82
-
83
-
84
-
85
-
86
-
87
-
88
 |
 |
