HP Pavilion 14-al000 Maintenance and Service Guide - Page 42
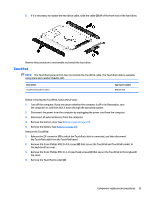
Hard drive, to which the hard drive cable is connected, and then
 |
View all HP Pavilion 14-al000 manuals
Add to My Manuals
Save this manual to your list of manuals |
Page 42 highlights
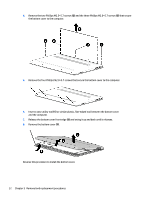
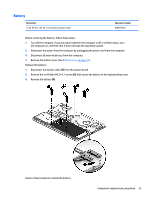
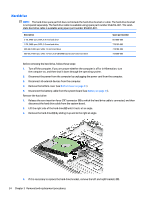
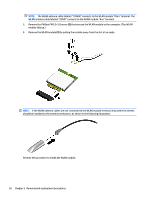
Hard drive NOTE: The hard drive spare part kit does not include the hard drive bracket or cable. The hard drive bracket is not spared separately. The hard drive cable is available using spare part number 856205-001. The solidstate hard drive cable is available using spare part number 856202-001. Description 2-TB, 5400-rpm, SATA, 9.5-mm hard drive 1-TB, 5400-rpm, SATA, 9.5-mm hard drive 500-GB, 5400-rpm, SATA, 7.0-mm hard drive 500-GB, 5400-rpm, SATA, 7.0-mm, 8.0-GB NAND hybrid solid-state hard drive Spare part number 801808-005 778192-005 778186-005 732000-005 Before removing the hard drive, follow these steps: 1. Turn off the computer. If you are unsure whether the computer is off or in Hibernation, turn the computer on, and then shut it down through the operating system. 2. Disconnect the power from the computer by unplugging the power cord from the computer. 3. Disconnect all external devices from the computer. 4. Remove the bottom cover (see Bottom cover on page 31). 5. Disconnect the battery cable from the system board (see Battery on page 33). Remove the hard drive: 1. Release the zero insertion force (ZIF) connector (1) to which the hard drive cable is connected, and then disconnect the hard drive cable from the system board. 2. Lift the right side of the hard drive (2) until it rests at an angle. 3. Remove the hard drive (3) by sliding it up and to the right at angle. 4. If it is necessary to replace the hard drive bracket, remove the left and right brackets (1). 34 Chapter 5 Removal and replacement procedures
-
 1
1 -
2
-
3
-
4
-
5
-
6
-
7
-
8
-
9
-
10
-
11
-
12
-
13
-
14
-
15
-
16
-
17
-
18
-
19
-
20
-
21
-
22
-
23
-
24
-
25
-
26
-
27
-
28
-
29
-
30
-
31
-
32
-
33
-
34
-
35
-
36
-
 37
37 -
 38
38 -
 39
39 -
 40
40 -
 41
41 -
 42
42 -
 43
43 -
 44
44 -
 45
45 -
 46
46 -
 47
47 -
48
-
49
-
50
-
51
-
52
-
53
-
54
-
55
-
56
-
57
-
58
-
59
-
60
-
61
-
62
-
63
-
64
-
65
-
66
-
67
-
68
-
69
-
70
-
71
-
72
-
73
-
74
-
75
-
76
-
77
-
78
-
79
-
80
-
81
-
82
-
83
-
84
-
85
-
86
-
87
 |
 |
