HP Pavilion n3150 HP Pavilion Notebook PC N3100 Series - Tips and Using - Page 7
Testing the Pavilion Notebook with HP Diag Tools
 |
View all HP Pavilion n3150 manuals
Add to My Manuals
Save this manual to your list of manuals |
Page 7 highlights
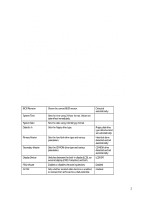
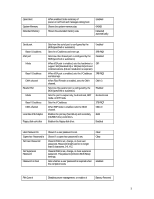
Testing the Pavilion Notebook with HP Diag Tools The HP Diag Tools provide two levels of system hardware testing: • Automated testing using the basic hardware test. • Advanced testing using the individual hardware tests. The tests are designed to run after the system reboots. This ensures that the computer will be in a predictable state, so the diagnostic program can properly test the hardware components. The tests are non-destructive and are designed to preserve the state of the computer. The notebook reboots when you exit the program so drivers can be loaded. To create a diagnostic floppy disk NOTE: You do not need to run the diagnostics from a floppy disk; however, it's a good idea to create a diagnostic disk in case something happens to your hard drive. To create a diagnostic floppy disk, download the diagnostic software package from the HP notebook PC Web site (http://www.hp.com/notebook). First run the downloaded file to unpack the files, then run diaginst to create the diagnostic disk. Note that you can create this diagnostic disk on any computer with Internet access. To run the diagnostic test 1. Insert the diagnostic disk in the floppy drive and restart the computer. or Restart the computer; when you see the HP logo, press F10 to start the diagnostics utility. 2. When you see the initial diagnostics screen, press F2 twice to continue. In case the initial diagnostics screen does not appear: • If you ran the diagnostics from a floppy disk, run scandisk on the floppy disk. If you discover errors on the disk, create a new diagnostic disk, using a different floppy disk, before running the test again. • If you ran the diagnostics from the hard disk, create a diagnostics floppy disk (according to the procedure above) and then follow step 1 above. 3. When the hardware detection finishes, check the list of detected hardware. If a device is not detected or fails its test below, it may be configured incorrectly in the BIOS Setup utility. You can confirm the problem by running BIOS Setup and checking the settings. 4. Run the basic test. Press F2 twice to start the basic hardware test. 5. Wait until the test has finished. 6. If you intend to exit without running advanced tests, press F4 twice to save system and test information in the Support Ticket log file, HPSUPPT.TXT. Then remove the diagnostic disk (if you used one) and press F3 twice to exit. 7. Optional: Run the advanced tests. Press F2 twice to open the advanced test screen. 7
-
 1
1 -
 2
2 -
 3
3 -
 4
4 -
 5
5 -
 6
6 -
 7
7 -
 8
8 -
 9
9 -
 10
10 -
 11
11 -
 12
12 -
13
-
14
-
15
-
16
-
17
-
18
-
19
-
20
-
21
-
22
-
23
-
24
-
25
-
26
-
27
-
28
-
29
-
30
-
31
-
32
-
33
-
34
-
35
-
36
-
37
-
38
-
39
 |
 |