HP Pavilion v2000 Getting Started Guide - Page 79
Copying a DVD or CD, Archiving Files on a CD or DVD, Start, All Programs, Sonic, DigitalMedia Home
 |
View all HP Pavilion v2000 manuals
Add to My Manuals
Save this manual to your list of manuals |
Page 79 highlights
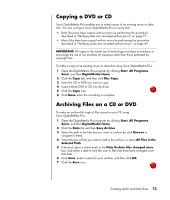
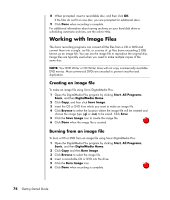
Copying a DVD or CD Sonic DigitalMedia Plus enables you to make copies of an existing music or data disc. You can configure Sonic DigitalMedia Plus to verify that: • Data files have been copied without errors by performing the procedure described in "Verifying data disc recorded without errors" on page 71. • Music files have been copied without errors by performing the procedure described in "Verifying audio disc recorded without errors" on page 69. IMPORTANT: HP supports the lawful use of technology and does not endorse or encourage the use of our products for purposes other than those permitted by copyright law. To make a copy of an existing music or data disc using Sonic DigitalMedia Plus: 1 Open the DigitalMedia Plus program by clicking Start, All Programs, Sonic, and then DigitalMedia Home. 2 Click the Copy tab, and then click Disc Copy. 3 Insert the CD or DVD you want to copy. 4 Insert a blank DVD or CD into the drive. 5 Click the Copy icon. 6 Click Done when the recording is complete. Archiving Files on a CD or DVD To make an archive file copy of files stored on your PC using Sonic DigitalMedia Plus: 1 Open the DigitalMedia Plus program by clicking Start, All Programs, Sonic, and then DigitalMedia Home. 2 Click the Data tab and then Easy Archive. 3 Select the path to the files that you want to archive (or click Browse to navigate to them). 4 Select the type of files you want to add to the archive, or select All Files in the Selected Path. 5 If desired, place a check mark in the Only Archive files changed since box, and select a date to limit the scan to files that have been changed since that date. 6 Click Save, enter a name for your archive, and then click OK. 7 Click the Burn icon. Creating Audio and Data Discs 73
-
 1
1 -
2
-
3
-
4
-
5
-
6
-
7
-
8
-
9
-
10
-
11
-
12
-
13
-
14
-
15
-
16
-
17
-
18
-
19
-
20
-
21
-
22
-
23
-
24
-
25
-
26
-
27
-
28
-
29
-
30
-
31
-
32
-
33
-
34
-
35
-
36
-
37
-
38
-
39
-
40
-
41
-
42
-
43
-
44
-
45
-
46
-
47
-
48
-
49
-
50
-
51
-
52
-
53
-
54
-
55
-
56
-
57
-
58
-
59
-
60
-
61
-
62
-
63
-
64
-
65
-
66
-
67
-
68
-
69
-
70
-
71
-
72
-
73
-
 74
74 -
 75
75 -
 76
76 -
 77
77 -
 78
78 -
 79
79 -
 80
80 -
 81
81 -
 82
82 -
 83
83 -
 84
84 -
85
-
86
-
87
-
88
-
89
-
90
-
91
-
92
-
93
-
94
-
95
-
96
-
97
-
98
-
99
-
100
-
101
-
102
-
103
-
104
-
105
-
106
-
107
-
108
-
109
-
110
-
111
-
112
-
113
-
114
-
115
-
116
-
117
-
118
-
119
-
120
 |
 |