HP Photosmart C6200 Basics Guide - Page 20
Shop for HP Supplies, Start, To replace the ink cartridges
 |
View all HP Photosmart C6200 manuals
Add to My Manuals
Save this manual to your list of manuals |
Page 20 highlights
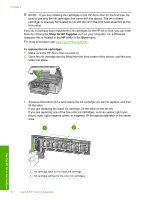
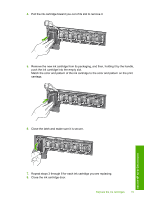
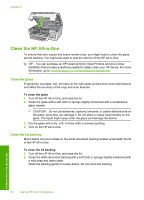
Chapter 3 NOTE: If you are installing ink cartridges in the HP All-in-One for the first time, be sure to use only the ink cartridges that came with the device. The ink in these cartridges is specially formulated to mix with the ink in the print head assembly at firsttime setup. If you do not already have replacement ink cartridges for the HP All-in-One, you can order them by clicking the Shop for HP Supplies icon on your computer. On a Windows computer this is located in the HP folder in the Start menu. For more information see www.hp.com/buy/supplies. To replace the ink cartridges 1. Make sure the HP All-in-One is turned on. 2. Open the ink cartridge door by lifting from the front center of the device, until the door locks into place. 3. Squeeze the bottom of the latch below the ink cartridge you want to replace, and then lift the latch. If you are replacing the black ink cartridge, lift the latch on the far left. If you are replacing one of the five color ink cartridges, such as yellow, light cyan (blue), cyan, light magenta (pink), or magenta, lift the appropriate latch in the center area. Use the HP All-in-One features 1 Ink cartridge latch for the black ink cartridge 2 Ink cartridge latches for the color ink cartridges 18 Use the HP All-in-One features
-
 1
1 -
2
-
3
-
4
-
5
-
6
-
7
-
8
-
9
-
10
-
11
-
12
-
13
-
14
-
 15
15 -
 16
16 -
 17
17 -
 18
18 -
 19
19 -
 20
20 -
 21
21 -
 22
22 -
 23
23 -
 24
24 -
 25
25 -
26
-
27
-
28
-
29
-
30
-
31
-
32
-
33
-
34
-
35
 |
 |
