HP Photosmart C6200 Basics Guide - Page 29
Information on ink cartridges and the print head, Turn off the HP All-in-One. - paper jam clean rollers
 |
View all HP Photosmart C6200 manuals
Add to My Manuals
Save this manual to your list of manuals |
Page 29 highlights
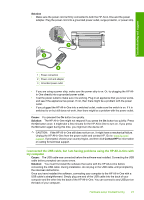
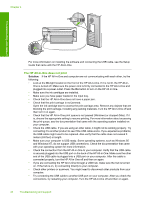
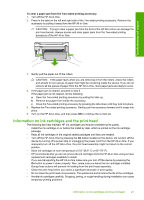
Troubleshooting and support To clear a paper jam from the Two-sided printing accessory 1. Turn off the HP All-in-One. 2. Press in the tabs on the left and right side of the Two-sided printing accessory. Remove the accessory by pulling it away from the HP All-in-One. CAUTION: Trying to clear a paper jam from the front of the HP All-in-One can damage the print mechanism. Always access and clear paper jams from the Two-sided printing accessory of the HP All-in-One. 3. Gently pull the paper out of the rollers. CAUTION: If the paper tears when you are removing it from the rollers, check the rollers and wheels for torn pieces of paper that might be remaining inside the device. If you do not remove all the pieces of paper from the HP All-in-One, more paper jams are likely to occur. 4. If the paper jam is cleared, proceed to step 5. If the paper jam is not cleared, do the following: a. Open the Two-sided printing accessory by pulling the tabs up. b. Remove any paper from inside the accessory. c. Close the Two-sided printing accessory by pressing the tabs down until they lock into place. 5. Replace the Two-sided printing accessory. Gently push the accessory forward until it snaps into place. 6. Turn on the HP All-in-One, and then press OK to continue the current job. Information on ink cartridges and the print head The following tips help maintain HP ink cartridges and ensure consistent print quality. • Install the ink cartridge on or before the install by date, which is printed on the ink cartridge package. • Keep all ink cartridges in the original sealed packages until they are needed. • Turn off the HP All-in-One by pressing the On button located on the device. Do not turn off the device by turning off a power strip or unplugging the power cord from the HP All-in-One. If you improperly turn off the HP All-in-One, the print head assembly might not return to the correct position. • Store ink cartridges at room temperature (15.6°-26.6° C or 60°-78° F). • HP recommends that you do not remove the ink cartridges from the HP All-in-One until you have replacement cartridges available to install. If you are transporting the HP All-in-One make sure you turn off the device by pressing the On button to power it down properly. Also, make sure you leave the ink cartridges installed. Doing these actions will prevent ink leaking from the print head assembly. • Clean the print head when you notice a significant decrease in print quality. • Do not clean the print head unnecessarily. This wastes ink and shortens the life of the cartridges. • Handle ink cartridges carefully. Dropping, jarring, or rough handling during installation can cause temporary printing problems. Information on ink cartridges and the print head 27
-
 1
1 -
2
-
3
-
4
-
5
-
6
-
7
-
8
-
9
-
10
-
11
-
12
-
13
-
14
-
15
-
16
-
17
-
18
-
19
-
20
-
21
-
22
-
23
-
 24
24 -
 25
25 -
 26
26 -
 27
27 -
 28
28 -
 29
29 -
 30
30 -
 31
31 -
 32
32 -
 33
33 -
 34
34 -
35
 |
 |
