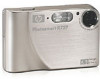
HP Photosmart R727 User Guide
HP Photosmart R727 Manual
 |
View all HP Photosmart R727 manuals
Add to My Manuals
Save this manual to your list of manuals |
HP Photosmart R727 manual content summary:
- HP Photosmart R727 | User Guide - Page 1
HP Photosmart R725/R727 Digital Camera User Guide - HP Photosmart R727 | User Guide - Page 2
contained herein is subject to change without notice. The only warranties for HP products and services are set forth in the express warranty statements accompanying such products and services. Nothing herein should be construed as constituting an additional warranty. HP shall not be liable - HP Photosmart R727 | User Guide - Page 3
the language 7 Set the region 8 Set the date and time 8 Install and format an optional memory card 8 Install the software 8 Using your camera 9 2 Taking pictures and recording video clips 11 Taking still pictures 11 Recording video clips 12 Instant Review...12 Auto focus and exposure 12 - HP Photosmart R727 | User Guide - Page 4
to a printer or online destinations 37 Buying prints online 38 7 Using the Setup Menu 39 8 Troubleshooting 41 Resetting the camera 41 Problems and solutions 41 9 Product support 46 Helpful websites...46 Getting assistance 46 A Managing batteries 48 Top points about batteries 48 Extending - HP Photosmart R727 | User Guide - Page 5
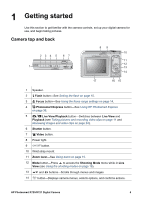
1 Getting started Use this section to get familiar with the camera controls, set up your digital camera for use, and begin taking pictures. Camera top and back 234 5 6 7 1 89 10 11 12 13 14 17 16 15 1 Speaker. 2 Flash button-See Setting the flash on page 15. 3 Focus button- - HP Photosmart R727 | User Guide - Page 6
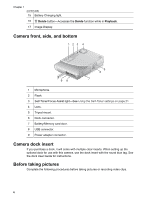
, it will come with multiple clear inserts. When setting up the optional dock for use with this camera, use the dock insert with the round blue tag. See the dock User Guide for instructions. Before taking pictures Complete the following procedures before taking pictures or recording video clips. 6 - HP Photosmart R727 | User Guide - Page 7
. 2. Insert the battery in the larger slot, pushing the battery in until the latch catches. 3. Close the Battery/Memory card door. Note Turn the camera off before removing the battery. Fully charge the battery before using it the first time (see Charge the battery on page 7). Charge the battery You - HP Photosmart R727 | User Guide - Page 8
39). Install and format an optional memory card 1. Turn off the camera and open the Battery/Memory card door. 2. Insert the optional memory card For information about supported memory cards, see Storage under Specifications on page 52. Install the software Note If you have trouble installing or - HP Photosmart R727 | User Guide - Page 9
the CD icon on the computer desktop. 3. Double-click the installer icon, then follow the on-screen instructions. About the HP Photosmart Software The CD that came with your camera contains the following versions of HP Photosmart Software: ● HP Photosmart Premier Software (for Windows XP and XP - HP Photosmart R727 | User Guide - Page 10
Chapter 1 (continued) For information on transferring images from your camera to a computer For information on printing images See Transferring images with HP Photosmart Software on page 33 See Printing images from the camera on page 34 Tip To switch between Live View and Playback, press . 10 - HP Photosmart R727 | User Guide - Page 11
12 Pictures remaining count. 5 Focus brackets (see Auto focus and exposure on page 12). Taking still pictures You can take a picture almost any time the camera is on, regardless of what is shown on the Image Display. 1. Press until appears briefly in the upper right corner of the Image Display - HP Photosmart R727 | User Guide - Page 12
Review After you have taken a still image or recorded a video clip, the camera displays it in Instant Review. If you want to delete the image or video and exposure When you press the Shutter button halfway down, the camera automatically measures and locks the focus and exposure. When you auto - HP Photosmart R727 | User Guide - Page 13
The sample image shows focus in regions one, two, and five. If the camera keeps focusing on something other than your subject, set Auto Focus Area to Lock (see Using Focus Lock on page 13). Optimizing focus When the camera cannot auto focus, the focus brackets turn red. This indicates the picture - HP Photosmart R727 | User Guide - Page 14
see Setting the flash on page 15). ● Set the camera on a tripod or stable surface. ● Turn on more to help you determine how to correct the problem for similar images in the future. If you Topics on blurry, dark, light, or grainy images in Troubleshooting on page 41 ● Using the focus range settings on - HP Photosmart R727 | User Guide - Page 15
physically adjusts the lens to make the subject of your picture appear closer. After you have zoomed the lens out fully using optical zoom, the camera employs digital zoom. Digital zoom uses no moving lens parts. Tip The more you zoom in on the subject of your picture, the more small - HP Photosmart R727 | User Guide - Page 16
information about red eye, see Red eye on page 16. Flash On-The camera always uses flash. If the light is behind your subject, use this setting -Eye Removal under Using the Capture Menu on page 18). Flash Off-The camera does not use flash. Use this setting to capture poorly lit subjects beyond the - HP Photosmart R727 | User Guide - Page 17
the action. Night Portrait-For capturing images of people at night. This mode uses the flash and a long exposure. As a result, you must set the camera on a tripod or stable surface. Night Scenery-For capturing night scenes. This mode uses a long exposure with no flash. As a result, you must set the - HP Photosmart R727 | User Guide - Page 18
add audio to images taken in Panorama mode, see Recording audio on page 27. Using the Capture Menu The Capture Menu allows you to adjust camera settings that affect the characteristics of the images and video clips you capture. 1. While in Live View, press to display the Capture Menu. 2. Use to - HP Photosmart R727 | User Guide - Page 19
with incandescent or halogen lighting. ● Fluorescent-For indoor scenes with fluorescent lighting. ● Manual-For setting a custom White Balance based on your target subject. To set the white balance, select Manual, then follow the onscreen instructions. HP Photosmart R725/R727 Digital Camera 19 - HP Photosmart R727 | User Guide - Page 20
. For best results, use Focus Lock (see Using Focus Lock on page 13) with Spot. ISO Speed-Adjusts the camera's sensitivity to light. For more information, see ISO speed on page 22. ● Auto (Default)-Camera selects the best ISO speed for scene. ● ISO 100-For best quality. ● ISO 200-For lower light - HP Photosmart R727 | User Guide - Page 21
On - 2 Shots, press , then press . For more details on selecting options in the Capture Menu, see Using the Capture Menu on page 18. 2. Set the camera on a tripod or stable surface. 3. Frame the subject in the Image Display. 4. The next steps depend on whether you are taking one or two still - HP Photosmart R727 | User Guide - Page 22
(see Bracketing under Using the Capture Menu on page 18). White Balance Different lighting conditions cast different colors. This setting allows the camera to compensate for this, reproducing colors more accurately and ensuring that whites appear white in the final image. You can also adjust the - HP Photosmart R727 | User Guide - Page 23
fast moving objects. Higher ISO speeds produce pictures with more grain (or noise) and, therefore, can be of lower quality. HP Photosmart R725/R727 Digital Camera 23 - HP Photosmart R727 | User Guide - Page 24
3 Reviewing images and video clips You can review and manipulate images and video clips in Playback as described here. For information about enhancing images, see Using the Playback Menu on page 25 and Using the Design Gallery Menu on page 29. Using Playback 1. Press until appears briefly in the - HP Photosmart R727 | User Guide - Page 25
the magnification. 4. Press to return to Playback. Using the Playback Menu 1. While in Playback, press . 2. Use to highlight an option. HP Photosmart R725/R727 Digital Camera 25 - HP Photosmart R727 | User Guide - Page 26
Chapter 3 3. Use to select an image or video clip, press instructions. 4. Press to exit the Playback Menu. , and follow the on-screen Image Advice-Analyzes image for focus, exposure, and so forth. Image Info-See Viewing - HP Photosmart R727 | User Guide - Page 27
to the displayed image, press . Note You can attach audio clips to individual images in a panoramic sequence. When you stitch the panoramic sequence (on-camera or on-computer), no audio is attached to the stitched image. You can, however, add audio to a stitched panorama as previously described. HP - HP Photosmart R727 | User Guide - Page 28
Chapter 3 If the currently displayed image already has an audio clip attached to it, the Record Audio sub-menu displays instead when you select Record Audio. ● Keep Current Clip-Retains the current audio clip and returns to the Playback Menu. ● Record New Clip-Records a new audio clip, replacing the - HP Photosmart R727 | User Guide - Page 29
the Design Gallery Menu tab. 3. Use to highlight an option, then press and follow the on-screen instructions. Apply Artistic Effects-See Applying artistic effects on page 29. Modify Color-See Modifying colors on page 30. that fades from the bottom up. HP Photosmart R725/R727 Digital Camera 29 - HP Photosmart R727 | User Guide - Page 30
an extra color layer to create a mood or feeling. 3. Press to select the color scheme and display the creative sub-menu. Follow the on-screen instructions to adjust the color. 4. Press to save a copy of the image with the specified color scheme and return to the Design Gallery Menu. Press Modify - HP Photosmart R727 | User Guide - Page 31
the on-screen instructions to adjust the border. 4. Press to save a copy of the image with the specified border and return to the Design Gallery Menu. Press to exit without saving and return to the Add Borders sub-menu. Removing red eyes When you select Remove Red Eyes, the camera processes the - HP Photosmart R727 | User Guide - Page 32
Chapter 4 When you print, the normal aspect ratios get cropped on the top and bottom (landscape) or on the sides (portrait). Cropping helps ensure that the content you want gets printed. 3. Press to save a copy of the cropped image and return to the Design Gallery Menu. Press to exit without - HP Photosmart R727 | User Guide - Page 33
this task using an optional HP Photosmart dock (see the dock User Guide). 1. If you have selected images for sharing or printing (see Selecting 2. Connect the camera and computer using the USB cable that came with your camera. 3. Turn on the camera and follow the instructions on the computer screen - HP Photosmart R727 | User Guide - Page 34
an Unsafe Removal warning, disregard the warning. If you encounter problems, set the camera's USB Configuration to Disk Drive (see USB Configuration under Using guides you through the process of transferring images. If no application starts automatically or if you want to copy the images manually, - HP Photosmart R727 | User Guide - Page 35
follow the on- screen instructions. - To change other settings, use on the camera to select a menu option, then use setting. 5. Press to begin printing. on the camera to change the Note If you connect the camera to a non-HP printer and encounter problems with printing, contact your printer - HP Photosmart R727 | User Guide - Page 36
for printing on page 37. Buy Prints Online-Specifies images to request from an online printing service. See Buying prints online on page 38. Share All Images-Allows you to share all images on the camera to a selected destination. See Sending all images to a printer or online destinations on page 37 - HP Photosmart R727 | User Guide - Page 37
3. Highlight Share Menu Setup..., then press . Connect the camera to your computer using the USB cable that came with your camera. Follow the instructions in the Share dialog box to set up destinations in your camera. 4. Disconnect the camera from the computer, then press to verify that the new - HP Photosmart R727 | User Guide - Page 38
in the Photosmart Express Menu. To deselect the image, press again. 5. Turn off the camera, connect it to your computer using the USB cable that came with your camera, then turn on the camera. Follow the instructions in the Buy Prints Online dialog box to purchase prints. 6. Disconnect the - HP Photosmart R727 | User Guide - Page 39
battery life. ● Medium (Default)-For normal viewing conditions. ● High-For very bright lighting conditions. Sounds Volume-Adjusts the speaker volume for camera sounds (such as button presses and shutter clicks) and recorded audio. Off, Low (Default), High. Focus Assist Light-Enables the focus - HP Photosmart R727 | User Guide - Page 40
(continued) TV Configuration-Sets the video signal format for displaying camera images on a TV. ● NTSC-Used primarily in North Sets the language. See Choose the language on page 7. Reset Settings-Resets camera to the factory default settings. ● Cancel-Exits the menu without resetting any of - HP Photosmart R727 | User Guide - Page 41
8 Troubleshooting Use this section to find information on: ● Resetting the camera (see Resetting the camera on page 41) ● Possible problems and solutions (see Problems and solutions on page 41) Resetting the camera If your camera does not respond when you press buttons, reset the camera. 1. Turn off - HP Photosmart R727 | User Guide - Page 42
I press the Shutter button. ● Press the Shutter button all the way down. ● The memory card or internal memory may be full. Transfer images from the camera to your computer, then format the internal memory or the memory card (see Install and format an optional memory card on page 8). Or replace the - HP Photosmart R727 | User Guide - Page 43
lens cover. My image is blurry. ● Use Focus Lock (see Using Focus Lock on page 13). ● Use a tripod to hold the camera steady, or improve lighting conditions. ● Set the camera to Macro, Auto Macro, Normal, or Infinity focus and try taking the picture again (see Using the focus range settings on - HP Photosmart R727 | User Guide - Page 44
off, then on again. If that does not fix the problem, reset the camera (see Resetting the camera on page 41). ● If the problem persists, contact HP Support (see Product support on page 46). I cannot transfer images from the camera to my computer. ● Either install the HP Photosmart Software (see - HP Photosmart R727 | User Guide - Page 45
Software on page 33). I am having a problem installing or using the HP Photosmart Software. ● Make sure your computer meets the minimum system requirements as listed on your camera packaging. ● Refer to the HP Customer Care website: www.hp.com/support. How can I get professional-quality prints if - HP Photosmart R727 | User Guide - Page 46
- Software and driver updates for your camera. - Valuable product and troubleshooting information for technical issues. - Proactive product updates, support alerts, and HP newsletters (available when you register your camera). 3. HP support by phone. Support options and fees vary by product, country - HP Photosmart R727 | User Guide - Page 47
you would like to extend or upgrade your camera's warranty, please contact the store where you bought the camera or check the HP Care Pack offers at www.hp.com/support. 6. If you already purchased an HP Care Pack Service, please check the support conditions on your contract. HP Photosmart R725/R727 - HP Photosmart R727 | User Guide - Page 48
To conserve battery power, the Image Display turns off after 45 seconds by default. Pressing any button wakes up the camera. After five minutes of inactivity, the camera turns off. To further extend battery life: ● Set Display Brightness to Low (see Display Brightness under Using the Setup Menu - HP Photosmart R727 | User Guide - Page 49
without a battery for a prolonged period, the clock may be reset and you may be prompted to update it the next time you power on the camera. Number of shots per battery type The following table shows the minimum, maximum, and average number of shots that may be obtained using the rechargeable - HP Photosmart R727 | User Guide - Page 50
is yellow. Charging complete: Quick recharger light is green. Safety precautions for recharging batteries You can recharge a Lithium Ion battery in the camera or purchase an optional dock with battery bay or a quick recharger. These devices may be warm while charging a Lithium Ion battery. This - HP Photosmart R727 | User Guide - Page 51
if the Lithium Ion battery appears damaged. ● Do not disassemble the camera, dock, or quick recharger. ● Unplug the HP AC power If it becomes difficult to insert the battery into or remove the battery from the camera, dock, or quick recharger, discontinue use of the battery and replace it with a - HP Photosmart R727 | User Guide - Page 52
B Specifications Resolution Still pictures: ● 6.3MP (2934 by 2171) total pixel count ● 6.1MP (2864 by 2160) effective pixel count Video clips (VGA-640 by 480 total pixel count; QVGA-320 by 240 total pixel count): ● VGA (Default)-24 frames/sec ● VGA -24 frames/sec ● QVGA -24 frames/sec - HP Photosmart R727 | User Guide - Page 53
LTPS TFT LCD with backlight; 203,400 pixels (960 by 240) total pixel count Storage ● 32MB internal flash memory. ● Slot for memory card. ● This camera supports standard and high speed, HP-branded Secure Digital (SD) memory cards, 8MB to 2GB. ● A large number of files (over 300) does affect the - HP Photosmart R727 | User Guide - Page 54
file size. Video quality The following table lists the approximate number of seconds of video clips that can be stored in internal memory when the camera is set to different Video Quality settings (see Video Quality under Using the Capture Menu on page 18). Normal (VGA )- (Default) 24 frames/sec - HP Photosmart R727 | User Guide - Page 55
Review 12, 18, 21, 39 interfaces 53 internal memory 11, 53 ISO Speed 20, 22 L Landscape mode 16 Language 7, 40 LEDs 5, 6 lens 6 lights on camera 5, 6 Lithium Ion battery 48, 50 Live View/Playback button 5 M Macro focus 13, 14 Magnify control 5 magnifying images 25 memory capacity 53 card 11 card - HP Photosmart R727 | User Guide - Page 56
install 8 solving problems 41 sounds of camera 39 Sounds Volume 39 space remaining in memory 11 specifications 52 Stitch Panorama 27 storage 53 Sunset mode 17 support process 46 T Theatre mode 16 Thumbnails 25 Thumbnails control 5 Time & Date 8, 39 transfer images 33 troubleshooting 41 turn on
-
 1
1 -
 2
2 -
 3
3 -
 4
4 -
 5
5 -
 6
6 -
 7
7 -
8
-
9
-
10
-
11
-
12
-
13
-
14
-
15
-
16
-
17
-
18
-
19
-
20
-
21
-
22
-
23
-
24
-
25
-
26
-
27
-
28
-
29
-
30
-
31
-
32
-
33
-
34
-
35
-
36
-
37
-
38
-
39
-
40
-
41
-
42
-
43
-
44
-
45
-
46
-
47
-
48
-
49
-
50
-
51
-
52
-
53
-
54
-
55
-
56
 |
 |

User Guide
HP Photosmart R725/R727
Digital Camera