HP Presario SR1900 Getting Started Guide - Page 104
Selecting the style, Changing the settings, User Defined.
 |
View all HP Presario SR1900 manuals
Add to My Manuals
Save this manual to your list of manuals |
Page 104 highlights
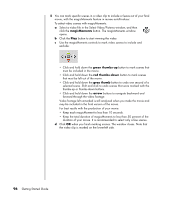
Selecting the style The muvee autoProducer program comes with a set of style templates for setting the pace, scene transition effects, and caption fonts. The style you use also affects how muvee autoProducer combines the video, picture, and music files in your movie project to produce the final movie. For example, using the Cinema style results in a movie that is moderately paced, color enhanced, and uses a wide-screen format. To select a style, just click a style from the list. A sample of the style displays in the preview window. Changing the settings You can adjust audio and video production settings for your movie. 1 Select the Change Settings button. The muvee Settings window opens. 2 Select the Duration tab to set the length of your video production and preferences. Click one of the following duration settings: • Fit to music. The produced version may reuse or drop some video and pictures. • Best fit for videos and pictures. The produced version may repeat or trim music. • User Defined. Select the duration in minutes and seconds: • If the duration of your music is longer than the duration of video and pictures, place a check in the Allow video and pictures to repeat check box to repeat video clips and pictures for the full duration of your music files. • If the total duration of your video and picture files is longer than the duration of your music, place a check in the Allow music to repeat check box to repeat music for the duration of the video clips. 3 Select the Video tab to set the video and still image preferences. Click one of the following settings: • Style default. Use the selected style to sequence still images and video clips. • Keep shots in sequence. Use the sequence of still images and video clips in the Add Video/Pictures window. • Shuffle shots. Move the slider bar to determine the frequency of sequencing still images and video clips. • Place a check in the Interleave pictures check box to blend pictures with video at intervals. 98 Getting Started Guide
-
 1
1 -
2
-
3
-
4
-
5
-
6
-
7
-
8
-
9
-
10
-
11
-
12
-
13
-
14
-
15
-
16
-
17
-
18
-
19
-
20
-
21
-
22
-
23
-
24
-
25
-
26
-
27
-
28
-
29
-
30
-
31
-
32
-
33
-
34
-
35
-
36
-
37
-
38
-
39
-
40
-
41
-
42
-
43
-
44
-
45
-
46
-
47
-
48
-
49
-
50
-
51
-
52
-
53
-
54
-
55
-
56
-
57
-
58
-
59
-
60
-
61
-
62
-
63
-
64
-
65
-
66
-
67
-
68
-
69
-
70
-
71
-
72
-
73
-
74
-
75
-
76
-
77
-
78
-
79
-
80
-
81
-
82
-
83
-
84
-
85
-
86
-
87
-
88
-
89
-
90
-
91
-
92
-
93
-
94
-
95
-
96
-
97
-
98
-
 99
99 -
 100
100 -
 101
101 -
 102
102 -
 103
103 -
 104
104 -
 105
105 -
 106
106 -
 107
107 -
 108
108 -
 109
109 -
110
-
111
-
112
-
113
-
114
-
115
-
116
-
117
-
118
-
119
-
120
 |
 |
