HP Presario SR1900 Getting Started Guide - Page 51
Configuring the Creative Sound Blaster X-Fi Sound Card (Select Models Only), Connecting the Speakers
 |
View all HP Presario SR1900 manuals
Add to My Manuals
Save this manual to your list of manuals |
Page 51 highlights
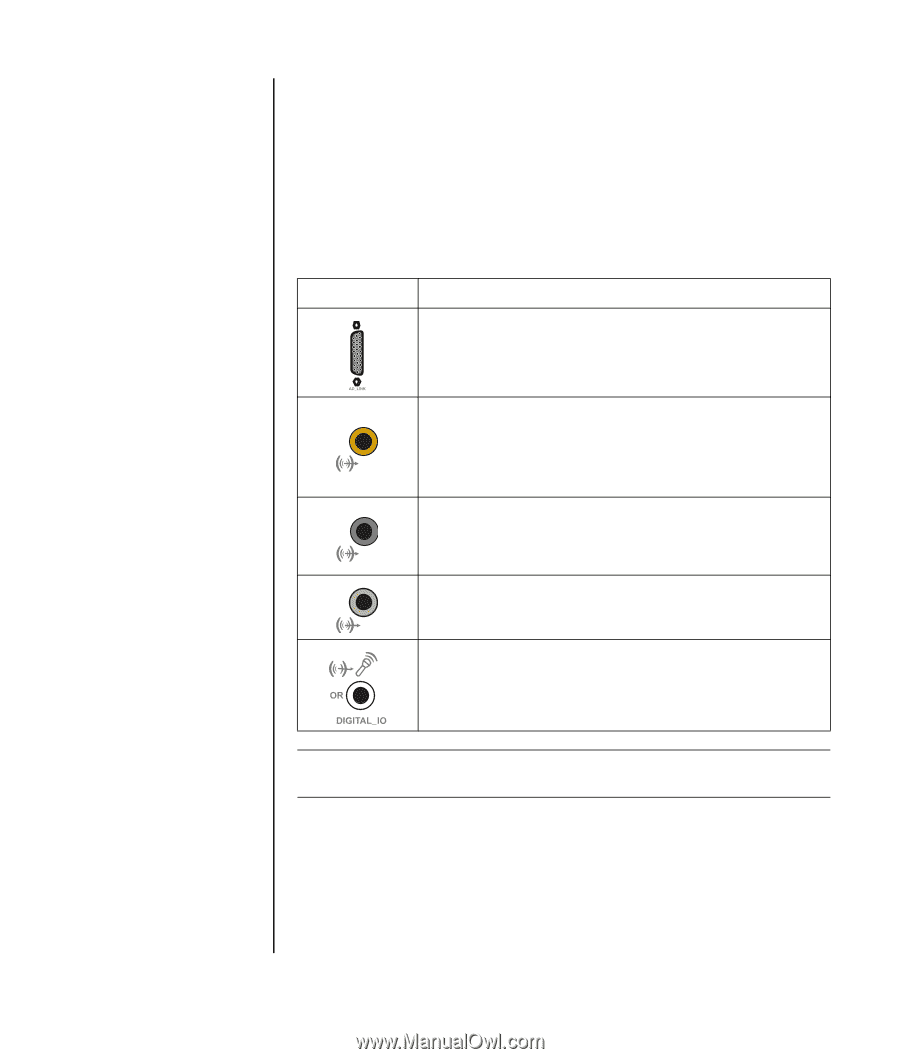
Configuring the Creative Sound Blaster X-Fi Sound Card (Select Models Only) This section provides an overview of connecting to, configuring, and recording with the Creative Sound Blaster X-Fi sound card. Connecting the Speakers Connector Description AD Link for AD_Link X-Fi I/O Console (The X-Fi Console is sold separately.) Line Out _3 (orange or yellow) • 5.1 audio setup: Front center, subwoofer _3 • 6.1 audio setup: Front center, subwoofer, and rear center • 7.1 audio setup: Front center, subwoofer, and side left Line Out _2 (black) • 4.1, 5.1, 6.1 audio setup: Rear left and right _2 • 7.1 audio setup: Rear left, rear right, and side right Line Out _1 (lime green) • 2/2.1 audio setup: Front left and right _1 FlexiJack (white) for Line-In, Microphone, Digital In/Out The FlexiJack supports three functions. You must select the function in the Creative Console Launcher. See "Configuring the FlexiJack connector" on page 46. NOTE: For additional information on connecting the speakers, refer to the documentation that came with your speakers. 1 Use the audio connection table above to connect your audio system to the sound card. 2 Turn on the PC. 3 Plug in and turn on the speaker system power. After connecting the speaker system to the sound card, follow the steps below to configure the speaker settings in the Creative Sound Blaster X-Fi software. See "Configuring the sound card software" on page 46. Configuring Speaker and Sound Options 45
-
 1
1 -
2
-
3
-
4
-
5
-
6
-
7
-
8
-
9
-
10
-
11
-
12
-
13
-
14
-
15
-
16
-
17
-
18
-
19
-
20
-
21
-
22
-
23
-
24
-
25
-
26
-
27
-
28
-
29
-
30
-
31
-
32
-
33
-
34
-
35
-
36
-
37
-
38
-
39
-
40
-
41
-
42
-
43
-
44
-
45
-
 46
46 -
 47
47 -
 48
48 -
 49
49 -
 50
50 -
 51
51 -
 52
52 -
 53
53 -
 54
54 -
 55
55 -
 56
56 -
57
-
58
-
59
-
60
-
61
-
62
-
63
-
64
-
65
-
66
-
67
-
68
-
69
-
70
-
71
-
72
-
73
-
74
-
75
-
76
-
77
-
78
-
79
-
80
-
81
-
82
-
83
-
84
-
85
-
86
-
87
-
88
-
89
-
90
-
91
-
92
-
93
-
94
-
95
-
96
-
97
-
98
-
99
-
100
-
101
-
102
-
103
-
104
-
105
-
106
-
107
-
108
-
109
-
110
-
111
-
112
-
113
-
114
-
115
-
116
-
117
-
118
-
119
-
120
 |
 |