HP ProLiant WS460c HP ProLiant WS460c Gen8 Workstation Blade with WS460c Graph - Page 43
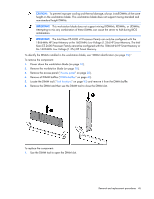
DIMM baffles
 |
View all HP ProLiant WS460c manuals
Add to My Manuals
Save this manual to your list of manuals |
Page 43 highlights
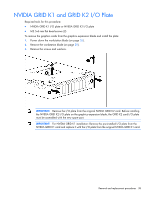
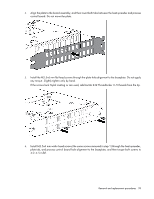
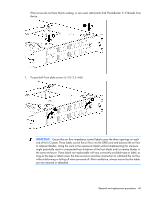
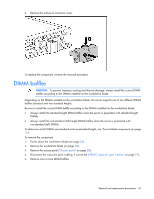
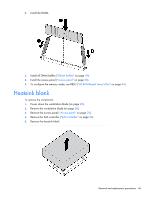
2. Remove the enclosure connector cover. To replace the component, reverse the removal procedure. DIMM baffles CAUTION: To prevent improper cooling and thermal damage, always install the correct DIMM baffles according to the DIMMs installed on the workstation blade. Depending on the DIMMs installed on the workstation blade, this server supports one of two different DIMM baffles (standard and non-standard height). Be sure to install the correct DIMM baffle according to the DIMMs installed on the workstation blade: • Always install the standard-height DIMM baffles when the server is populated with standard-height DIMMs. • Always install the non-standard (tall) height DIMM baffles when the server is populated with non-standard (tall) DIMMs. To determine which DIMMs are standard and non-standard height, see "Server blade components (on page 15)." To remove the component: 1. Power down the workstation blade (on page 26). 2. Remove the workstation blade (on page 28). 3. Remove the access panel ("Access panel" on page 28). 4. Disconnect the capacitor pack cabling, if connected ("FBWC capacitor pack cabling" on page 97). 5. Remove one or more DIMM baffles. Removal and replacement procedures 43
-
 1
1 -
2
-
3
-
4
-
5
-
6
-
7
-
8
-
9
-
10
-
11
-
12
-
13
-
14
-
15
-
16
-
17
-
18
-
19
-
20
-
21
-
22
-
23
-
24
-
25
-
26
-
27
-
28
-
29
-
30
-
31
-
32
-
33
-
34
-
35
-
36
-
37
-
 38
38 -
 39
39 -
 40
40 -
 41
41 -
 42
42 -
 43
43 -
 44
44 -
 45
45 -
 46
46 -
 47
47 -
 48
48 -
49
-
50
-
51
-
52
-
53
-
54
-
55
-
56
-
57
-
58
-
59
-
60
-
61
-
62
-
63
-
64
-
65
-
66
-
67
-
68
-
69
-
70
-
71
-
72
-
73
-
74
-
75
-
76
-
77
-
78
-
79
-
80
-
81
-
82
-
83
-
84
-
85
-
86
-
87
-
88
-
89
-
90
-
91
-
92
-
93
-
94
-
95
-
96
-
97
-
98
-
99
-
100
-
101
-
102
-
103
-
104
-
105
-
106
-
107
 |
 |
