HP ProLiant WS460c HP ProLiant WS460c Gen8 Workstation Blade with WS460c Graph - Page 46
Heatsink blank
 |
View all HP ProLiant WS460c manuals
Add to My Manuals
Save this manual to your list of manuals |
Page 46 highlights
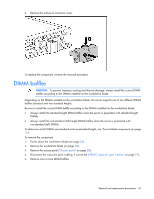
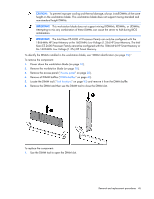
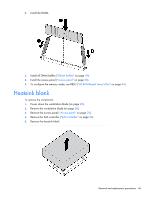
2. Install the DIMM. 3. Install all DIMM baffles ("DIMM baffles" on page 43). 4. Install the access panel ("Access panel" on page 28). 5. To configure the memory mode, use RBSU ("HP ROM-Based Setup Utility" on page 84). Heatsink blank To remove the component: 1. Power down the workstation blade (on page 26). 2. Remove the workstation blade (on page 28). 3. Remove the access panel ("Access panel" on page 28). 4. Remove the SAS controller ("SAS controller" on page 54). 5. Remove the heatsink blank. Removal and replacement procedures 46
-
 1
1 -
2
-
3
-
4
-
5
-
6
-
7
-
8
-
9
-
10
-
11
-
12
-
13
-
14
-
15
-
16
-
17
-
18
-
19
-
20
-
21
-
22
-
23
-
24
-
25
-
26
-
27
-
28
-
29
-
30
-
31
-
32
-
33
-
34
-
35
-
36
-
37
-
38
-
39
-
40
-
 41
41 -
 42
42 -
 43
43 -
 44
44 -
 45
45 -
 46
46 -
 47
47 -
 48
48 -
 49
49 -
 50
50 -
 51
51 -
52
-
53
-
54
-
55
-
56
-
57
-
58
-
59
-
60
-
61
-
62
-
63
-
64
-
65
-
66
-
67
-
68
-
69
-
70
-
71
-
72
-
73
-
74
-
75
-
76
-
77
-
78
-
79
-
80
-
81
-
82
-
83
-
84
-
85
-
86
-
87
-
88
-
89
-
90
-
91
-
92
-
93
-
94
-
95
-
96
-
97
-
98
-
99
-
100
-
101
-
102
-
103
-
104
-
105
-
106
-
107
 |
 |

Removal and replacement procedures
46
2.
Install the DIMM.
3.
Install all DIMM baffles ("
DIMM baffles
" on page
43
).
4.
Install the access panel ("
Access panel
" on page
28
).
5.
To configure the memory mode, use RBSU ("
HP ROM-Based Setup Utility
" on page
84
).
Heatsink blank
To remove the component:
1.
Power down the workstation blade (on page
26
).
2.
Remove the workstation blade (on page
28
).
3.
Remove the access panel ("
Access panel
" on page
28
).
4.
Remove the SAS controller ("
SAS controller
" on page
54
).
5.
Remove the heatsink blank.