HP Scanjet 3970 HP Scanjet 2400, 3670, 3690, and 3970 digital flatbed scanners - Page 20
scan negatives, Picture, Negatives from a Transparent Materials Adapter TMA, Accept
 |
View all HP Scanjet 3970 manuals
Add to My Manuals
Save this manual to your list of manuals |
Page 20 highlights
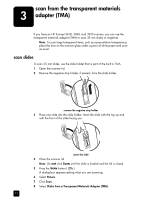
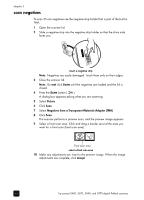
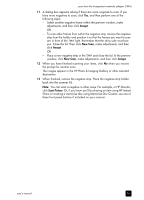
chapter 3 scan negatives To scan 35 mm negatives use the negative strip holder that is part of the built-in TMA. 1 Open the scanner lid. 2 Slide a negative strip into the negative strip holder so that the shiny side faces you. insert a negative strip Note: Negatives are easily damaged. Touch them only on their edges. 3 Close the scanner lid. Note: Do not click SCAN until the negatives are loaded and the lid is closed. 4 Press the SCAN button ( ). A dialog box appears asking what you are scanning. 5 Select Picture. 6 Click Scan. 7 Select Negatives from a Transparent Materials Adapter (TMA). 8 Click Scan. The scanner performs a preview scan, and the preview image appears. 9 Select a final scan area. Click and drag a border around the area you want for a final scan (final scan area). Final scan area select a final scan area 10 Make any adjustments you want to the preview image. When the image adjustments are complete, click Accept. 15 hp scanjet 2400, 3670, 3690, and 3970 digital flatbed scanners
-
 1
1 -
2
-
3
-
4
-
5
-
6
-
7
-
8
-
9
-
10
-
11
-
12
-
13
-
14
-
 15
15 -
 16
16 -
 17
17 -
 18
18 -
 19
19 -
 20
20 -
 21
21 -
 22
22 -
 23
23 -
 24
24 -
 25
25 -
26
-
27
-
28
-
29
-
30
-
31
-
32
-
33
-
34
-
35
-
36
 |
 |
