HP Surestore E Tape Library Model 2/20 HP SureStore E Tape Library Models 2/20 - Page 179
Partial Availability, Upgrading Firmware
 |
View all HP Surestore E Tape Library Model 2/20 manuals
Add to My Manuals
Save this manual to your list of manuals |
Page 179 highlights
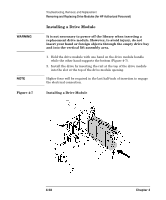
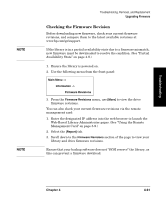
Troubleshooting NOTE NOTE Troubleshooting, Removal, and Replacement Removing and Replacing Drive Modules (for HP Authorized Personnel) 3. Tighten the top and bottom thumbscrews, securing the drive module into the library. 4. Plug the ribbon connector into the back of the drive module (Figure 4-5 on page 4-56). 5. Gently fold the ribbon cable (attached to the plate and SCSI cable), into the back of the drive module. 6. Holding the connector plate in place, tighten the thumbscrews on each side of the connector. 7. Bring the new drive module online using the front panel display. a. Enter the Administration then the Online Drive Repair menus. b. Select the drive module that has been replaced. Bring the drive back online. c. If you have increased the number of drives since the last power cycle, you must power cycle the library for the library to recognize the additional drives. The library will automatically run a self-test when the drive has been brought online. When the drive is successfully brought online, the new drive will adopt the SCSI ID of the current drive position. You may need to use the host backup software to recognize the new drive when bringing it online. If the software does not have the capability to automatically detect the new drive, you may need to reboot the host. 8. Update the drive firmware if needed. (See "Upgrading Firmware" on page 4-60.) You may get a drive firmware mismatch error if you have multiple drives with different firmware revisions. See Table 4-1, "Partial Availability Conditions," on page 4-9. Chapter 4 4-59
-
 1
1 -
2
-
3
-
4
-
5
-
6
-
7
-
8
-
9
-
10
-
11
-
12
-
13
-
14
-
15
-
16
-
17
-
18
-
19
-
20
-
21
-
22
-
23
-
24
-
25
-
26
-
27
-
28
-
29
-
30
-
31
-
32
-
33
-
34
-
35
-
36
-
37
-
38
-
39
-
40
-
41
-
42
-
43
-
44
-
45
-
46
-
47
-
48
-
49
-
50
-
51
-
52
-
53
-
54
-
55
-
56
-
57
-
58
-
59
-
60
-
61
-
62
-
63
-
64
-
65
-
66
-
67
-
68
-
69
-
70
-
71
-
72
-
73
-
74
-
75
-
76
-
77
-
78
-
79
-
80
-
81
-
82
-
83
-
84
-
85
-
86
-
87
-
88
-
89
-
90
-
91
-
92
-
93
-
94
-
95
-
96
-
97
-
98
-
99
-
100
-
101
-
102
-
103
-
104
-
105
-
106
-
107
-
108
-
109
-
110
-
111
-
112
-
113
-
114
-
115
-
116
-
117
-
118
-
119
-
120
-
121
-
122
-
123
-
124
-
125
-
126
-
127
-
128
-
129
-
130
-
131
-
132
-
133
-
134
-
135
-
136
-
137
-
138
-
139
-
140
-
141
-
142
-
143
-
144
-
145
-
146
-
147
-
148
-
149
-
150
-
151
-
152
-
153
-
154
-
155
-
156
-
157
-
158
-
159
-
160
-
161
-
162
-
163
-
164
-
165
-
166
-
167
-
168
-
169
-
170
-
171
-
172
-
173
-
 174
174 -
 175
175 -
 176
176 -
 177
177 -
 178
178 -
 179
179 -
 180
180 -
 181
181 -
 182
182 -
 183
183 -
 184
184 -
185
-
186
-
187
-
188
-
189
-
190
-
191
-
192
-
193
-
194
-
195
-
196
-
197
-
198
-
199
-
200
-
201
-
202
-
203
-
204
-
205
-
206
-
207
-
208
-
209
-
210
-
211
-
212
-
213
-
214
-
215
-
216
-
217
-
218
-
219
-
220
-
221
-
222
-
223
-
224
-
225
-
226
-
227
-
228
-
229
-
230
-
231
-
232
-
233
-
234
-
235
-
236
-
237
-
238
-
239
-
240
-
241
-
242
-
243
-
244
-
245
-
246
-
247
-
248
-
249
-
250
-
251
-
252
-
253
-
254
-
255
-
256
 |
 |