HP XP20000/XP24000 HP StorageWorks XP24000/XP20000 Audit Log Reference Guide ( - Page 14
window. The Audit Log Transfer window see, Go - Security - Audit log Transfer
 |
View all HP XP20000/XP24000 manuals
Add to My Manuals
Save this manual to your list of manuals |
Page 14 highlights
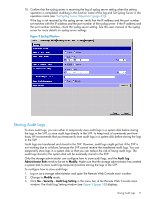
2. Log on as a storage administrator and open the Remote Web Console main window. 3. Change to Modify mode. 4. Click Go-Security-Audit log Transfer in the menu bar of the Remote Web Console main window. The Audit Log Transfer window displays. (see Figure 1 (page 15)). 5. Select one of the following: • If using a primary FTP server: ◦ Select Enable in Output to Primary Server. ◦ Enter the IP Address in the Primary Server Setting. Do not enter the periods. ◦ Enter the User ID and the Password you use to login the primary FTP server. ◦ Enter the output folder where the audit log information file will be sent. Specify a relative directory from the home directory as that folder. • If using a secondary FTP server: ◦ Click Enable in Output to Secondary Server. ◦ Enter the IP Address in the Secondary Server Setting. Do not enter the periods. ◦ Enter the User ID and the Password you use to login the secondary FTP server. ◦ Enter the output folder where the audit log information file will be sent. Specify a relative directory from the home directory as that folder. 6. Click Apply. A confirmation message will display. 7. Click OK. 8. Confirm that the FTP server setting is correct, and then click Transfer and manually transfer the audit log information file. A message displays indicating that the transfer has completed. There are cases, such as when an SVP is replaced, that will require the input of the configuration in the Audit Log Transfer window again. Keep a list of the items you entered in the Audit Log Transfer window, such as the IP address. Follow the steps below to transfer the audit log information file from the SVP to the FTP server manually. 1. Log on as a storage administrator and open the Remote Web Console main window. 2. Click Go - Security - Audit log Transfer in the menu bar of the Remote Web Console main window. The Audit Log Transfer window (see Figure 1 (page 15)) displays. 3. Click Audit Log Transfer in the Audit Log window. A message displays indicating that the transfer has completed. If you change the configuration in the Audit Log Transfer window (when the items set in the window appear in blue italic letters), click Apply and apply the configuration in the window to the storage system, and then click Transfer. 14 Introduction
-
 1
1 -
2
-
3
-
4
-
5
-
6
-
7
-
8
-
 9
9 -
 10
10 -
 11
11 -
 12
12 -
 13
13 -
 14
14 -
 15
15 -
 16
16 -
 17
17 -
 18
18 -
 19
19 -
20
-
21
-
22
-
23
-
24
-
25
-
26
-
27
-
28
-
29
-
30
-
31
-
32
-
33
-
34
-
35
-
36
-
37
-
38
-
39
-
40
-
41
-
42
-
43
-
44
-
45
-
46
-
47
-
48
-
49
-
50
-
51
-
52
-
53
-
54
-
55
-
56
-
57
-
58
-
59
-
60
-
61
-
62
-
63
-
64
-
65
-
66
-
67
-
68
-
69
-
70
-
71
-
72
-
73
-
74
-
75
-
76
-
77
-
78
-
79
-
80
-
81
-
82
-
83
-
84
-
85
-
86
-
87
-
88
-
89
-
90
-
91
-
92
-
93
-
94
-
95
-
96
-
97
-
98
-
99
-
100
-
101
-
102
-
103
-
104
-
105
-
106
-
107
-
108
-
109
-
110
-
111
-
112
-
113
-
114
-
115
-
116
-
117
-
118
-
119
-
120
-
121
-
122
-
123
-
124
-
125
-
126
-
127
-
128
-
129
-
130
-
131
-
132
-
133
-
134
-
135
-
136
-
137
-
138
-
139
-
140
-
141
-
142
-
143
-
144
-
145
-
146
-
147
-
148
-
149
-
150
-
151
-
152
-
153
-
154
-
155
-
156
-
157
-
158
-
159
-
160
-
161
-
162
-
163
-
164
-
165
-
166
-
167
-
168
-
169
-
170
-
171
-
172
-
173
-
174
-
175
-
176
-
177
-
178
-
179
-
180
-
181
-
182
-
183
-
184
-
185
-
186
-
187
-
188
-
189
-
190
-
191
-
192
-
193
-
194
-
195
-
196
-
197
-
198
-
199
-
200
-
201
-
202
-
203
-
204
-
205
-
206
-
207
-
208
-
209
-
210
-
211
-
212
-
213
-
214
-
215
-
216
-
217
-
218
-
219
-
220
-
221
-
222
-
223
-
224
-
225
-
226
-
227
-
228
-
229
-
230
-
231
-
232
-
233
-
234
-
235
-
236
-
237
-
238
-
239
-
240
-
241
-
242
-
243
-
244
-
245
-
246
-
247
-
248
-
249
-
250
-
251
-
252
-
253
-
254
-
255
-
256
-
257
-
258
-
259
-
260
-
261
-
262
-
263
-
264
-
265
-
266
-
267
-
268
-
269
-
270
-
271
-
272
-
273
-
274
-
275
-
276
-
277
-
278
-
279
 |
 |
