HP dx2100 Quick Setup & Getting Started Guide - Page 8
Step 5: Connect the Power Cords
 |
View all HP dx2100 manuals
Add to My Manuals
Save this manual to your list of manuals |
Page 8 highlights
Quick Setup Step 5: Connect the Power Cords Connect the power cords and monitor cord as shown. Turn on the monitor, then turn on the computer. Å WARNING: To reduce the risk of electric shock or damage to the equipment: ■ Do not disable the power cord grounding plug. The grounding plug is an important safety feature. ■ Plug the power cord into a grounded (earthed) electrical outlet that is easily accessible at all times. ■ Disconnect power from the computer by unplugging the power cord from either the electrical outlet or the computer. Ä CAUTION: Be sure there is a 4-inch (10.2 cm) clearance on all vented sides of the computer and monitor to permit the required airflow. Quick Setup & Getting Started www.hp.com 1-5
-
 1
1 -
2
-
 3
3 -
 4
4 -
 5
5 -
 6
6 -
 7
7 -
 8
8 -
 9
9 -
 10
10 -
 11
11 -
 12
12 -
 13
13 -
14
-
15
-
16
-
17
-
18
-
19
-
20
 |
 |

Quick Setup
Quick Setup & Getting Started
www.hp.com
1-5
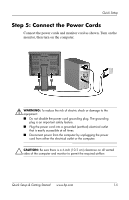
Step 5: Connect the Power Cords
Connect the power cords and monitor cord as shown. Turn on the
monitor, then turn on the computer.
Å
WARNING:
To reduce the risk of electric shock or damage to the
equipment:
■
Do not disable the power cord grounding plug. The grounding
plug is an important safety feature.
■
Plug the power cord into a grounded (earthed) electrical outlet
that is easily accessible at all times.
■
Disconnect power from the computer by unplugging the power
cord from either the electrical outlet or the computer.
Ä
CAUTION:
Be sure there is a 4-inch (10.2 cm) clearance on all vented
sides of the computer and monitor to permit the required airflow.