HP dx2390 Hardware Reference Guide - dx2390 Microtower Model - Page 40
Installing an Internal 3.5-inch Hard Drive, Disconnecting the Hard Drive Cables
 |
View all HP dx2390 manuals
Add to My Manuals
Save this manual to your list of manuals |
Page 40 highlights
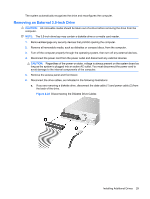
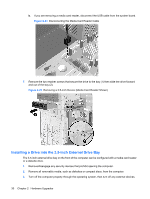
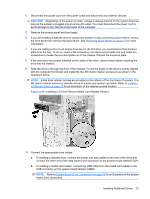
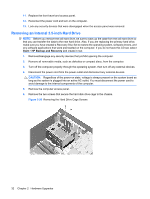
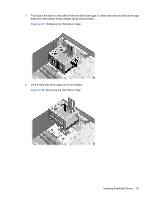
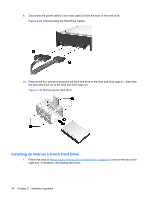
9. Disconnect the power cable (1) and data cable (2) from the back of the hard drive. Figure 2-29 Disconnecting the Hard Drive Cables 10. Remove the four screws that secure the hard disk drive to the hard disk drive cage (1), then slide the hard disk drive out of the hard disk drive cage (2). Figure 2-30 Removing the Hard Drive Installing an Internal 3.5-inch Hard Drive 1. Follow the steps in Removing an Internal 3.5-inch Hard Drive on page 32 to remove the hard drive cage and, if necessary, the existing hard drive. 34 Chapter 2 Hardware Upgrades
-
 1
1 -
2
-
3
-
4
-
5
-
6
-
7
-
8
-
9
-
10
-
11
-
12
-
13
-
14
-
15
-
16
-
17
-
18
-
19
-
20
-
21
-
22
-
23
-
24
-
25
-
26
-
27
-
28
-
29
-
30
-
31
-
32
-
33
-
34
-
 35
35 -
 36
36 -
 37
37 -
 38
38 -
 39
39 -
 40
40 -
 41
41 -
 42
42 -
 43
43 -
 44
44 -
 45
45 -
46
-
47
-
48
-
49
-
50
-
51
-
52
-
53
-
54
-
55
-
56
-
57
 |
 |
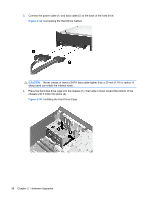
9.
Disconnect the power cable (1) and data cable (2) from the back of the hard drive.
Figure 2-29
Disconnecting the Hard Drive Cables
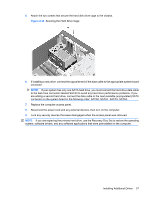
10.
Remove the four screws that secure the hard disk drive to the hard disk drive cage (1), then slide
the hard disk drive out of the hard disk drive cage (2).
Figure 2-30
Removing the Hard Drive
Installing an Internal 3.5-inch Hard Drive
1.
Follow the steps in
Removing an Internal 3.5-inch Hard Drive
on page
32
to remove the hard drive
cage and, if necessary, the existing hard drive.
34
Chapter 2
Hardware Upgrades