HP dx7300 HP Compaq dx7300 Business PC Service Reference Guide, 1st Edition - Page 111
Hood Sensor
 |
View all HP dx7300 manuals
Add to My Manuals
Save this manual to your list of manuals |
Page 111 highlights
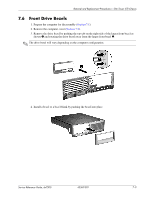
Removal and Replacement Procedures- Slim Tower (ST) Chassis 7.3 Hood Sensor 1. Prepare the computer for disassembly. 2. Remove the computer cover. 3. Remove the special security clip (Section 7.4.1) from the top corner of the power supply cage. 4. Raise the power supply to its full upright position. 5. Disconnect the hood sensor cable from the system board. 6. Slide the hood sensor switch mounted on the power supply towards the outside of the computer 1 and lower it through the slot 2. To install the hood sensor, reverse the removal procedure. Service Reference Guide, dx7300 433611-001 7-5
-
 1
1 -
2
-
3
-
4
-
5
-
6
-
7
-
8
-
9
-
10
-
11
-
12
-
13
-
14
-
15
-
16
-
17
-
18
-
19
-
20
-
21
-
22
-
23
-
24
-
25
-
26
-
27
-
28
-
29
-
30
-
31
-
32
-
33
-
34
-
35
-
36
-
37
-
38
-
39
-
40
-
41
-
42
-
43
-
44
-
45
-
46
-
47
-
48
-
49
-
50
-
51
-
52
-
53
-
54
-
55
-
56
-
57
-
58
-
59
-
60
-
61
-
62
-
63
-
64
-
65
-
66
-
67
-
68
-
69
-
70
-
71
-
72
-
73
-
74
-
75
-
76
-
77
-
78
-
79
-
80
-
81
-
82
-
83
-
84
-
85
-
86
-
87
-
88
-
89
-
90
-
91
-
92
-
93
-
94
-
95
-
96
-
97
-
98
-
99
-
100
-
101
-
102
-
103
-
104
-
105
-
 106
106 -
 107
107 -
 108
108 -
 109
109 -
 110
110 -
 111
111 -
 112
112 -
 113
113 -
 114
114 -
 115
115 -
 116
116 -
117
-
118
-
119
-
120
-
121
-
122
-
123
-
124
-
125
-
126
-
127
-
128
-
129
-
130
-
131
-
132
-
133
-
134
-
135
-
136
-
137
-
138
-
139
-
140
-
141
-
142
-
143
-
144
-
145
-
146
-
147
-
148
-
149
-
150
-
151
-
152
-
153
-
154
-
155
-
156
-
157
-
158
-
159
-
160
-
161
-
162
-
163
-
164
-
165
-
166
-
167
-
168
-
169
-
170
-
171
-
172
-
173
-
174
-
175
-
176
-
177
-
178
-
179
-
180
-
181
-
182
-
183
-
184
-
185
-
186
-
187
-
188
-
189
-
190
-
191
-
192
-
193
-
194
-
195
-
196
-
197
-
198
-
199
-
200
-
201
-
202
-
203
-
204
-
205
-
206
-
207
-
208
-
209
-
210
-
211
-
212
-
213
-
214
-
215
-
216
-
217
-
218
-
219
-
220
-
221
-
222
-
223
-
224
-
225
-
226
-
227
-
228
-
229
-
230
-
231
-
232
-
233
-
234
 |
 |

Service Reference Guide, dx7300
433611-001
7–5
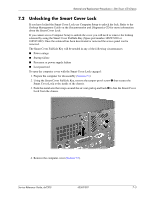
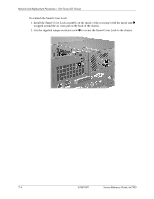
Removal and Replacement Procedures— Slim Tower (ST) Chassis
7.3 Hood Sensor
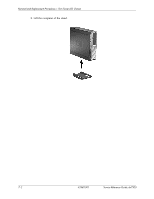
1. Prepare the computer for disassembly.
2. Remove the computer cover.
3. Remove the special security clip (
Section 7.4.1
) from the top corner of the power supply
cage.
4. Raise the power supply to its full upright position.
5. Disconnect the hood sensor cable from the system board.
6. Slide the hood sensor switch mounted on the power supply towards the outside of the
computer
1
and lower it through the slot
2
.
To install the hood sensor, reverse the removal procedure.