HP dx7300 HP Compaq dx7300 Business PC Service Reference Guide, 1st Edition - Page 133
External 3.5-inch Drive
 |
View all HP dx7300 manuals
Add to My Manuals
Save this manual to your list of manuals |
Page 133 highlights
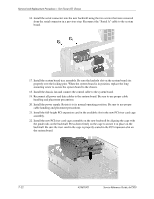
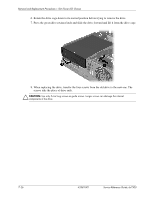
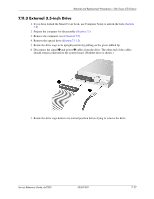
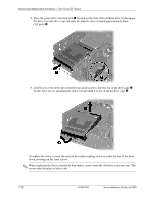
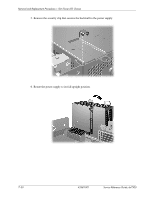
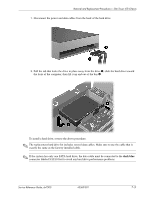
Removal and Replacement Procedures- Slim Tower (ST) Chassis 7.11.3 External 3.5-inch Drive 1. If you have locked the Smart Cover Lock, use Computer Setup to unlock the lock (Section 7.2). 2. Prepare the computer for disassembly (Section 7.1). 3. Remove the computer cover (Section 7.5). 4. Remove the optical drive (Section 7.11.2). 5. Rotate the drive cage to its upright position by pulling on the green-tabbed lip. 6. Disconnect the signal 1 and power 2 cables from the drive. The other end of the cables should remain connected to the system board. (Diskette drive is shown.) 7. Rotate the drive cage down to its normal position before trying to remove the drive. Service Reference Guide, dx7300 433611-001 7-27
-
 1
1 -
2
-
3
-
4
-
5
-
6
-
7
-
8
-
9
-
10
-
11
-
12
-
13
-
14
-
15
-
16
-
17
-
18
-
19
-
20
-
21
-
22
-
23
-
24
-
25
-
26
-
27
-
28
-
29
-
30
-
31
-
32
-
33
-
34
-
35
-
36
-
37
-
38
-
39
-
40
-
41
-
42
-
43
-
44
-
45
-
46
-
47
-
48
-
49
-
50
-
51
-
52
-
53
-
54
-
55
-
56
-
57
-
58
-
59
-
60
-
61
-
62
-
63
-
64
-
65
-
66
-
67
-
68
-
69
-
70
-
71
-
72
-
73
-
74
-
75
-
76
-
77
-
78
-
79
-
80
-
81
-
82
-
83
-
84
-
85
-
86
-
87
-
88
-
89
-
90
-
91
-
92
-
93
-
94
-
95
-
96
-
97
-
98
-
99
-
100
-
101
-
102
-
103
-
104
-
105
-
106
-
107
-
108
-
109
-
110
-
111
-
112
-
113
-
114
-
115
-
116
-
117
-
118
-
119
-
120
-
121
-
122
-
123
-
124
-
125
-
126
-
127
-
 128
128 -
 129
129 -
 130
130 -
 131
131 -
 132
132 -
 133
133 -
 134
134 -
 135
135 -
 136
136 -
 137
137 -
 138
138 -
139
-
140
-
141
-
142
-
143
-
144
-
145
-
146
-
147
-
148
-
149
-
150
-
151
-
152
-
153
-
154
-
155
-
156
-
157
-
158
-
159
-
160
-
161
-
162
-
163
-
164
-
165
-
166
-
167
-
168
-
169
-
170
-
171
-
172
-
173
-
174
-
175
-
176
-
177
-
178
-
179
-
180
-
181
-
182
-
183
-
184
-
185
-
186
-
187
-
188
-
189
-
190
-
191
-
192
-
193
-
194
-
195
-
196
-
197
-
198
-
199
-
200
-
201
-
202
-
203
-
204
-
205
-
206
-
207
-
208
-
209
-
210
-
211
-
212
-
213
-
214
-
215
-
216
-
217
-
218
-
219
-
220
-
221
-
222
-
223
-
224
-
225
-
226
-
227
-
228
-
229
-
230
-
231
-
232
-
233
-
234
 |
 |

Service Reference Guide, dx7300
433611-001
7–27
Removal and Replacement Procedures— Slim Tower (ST) Chassis
7.11.3 External 3.5-inch Drive
1. If you have locked the Smart Cover Lock, use Computer Setup to unlock the lock (
Section
7.2
).
2. Prepare the computer for disassembly (
Section 7.1
).
3. Remove the computer cover (
Section 7.5
).
4. Remove the optical drive (
Section 7.11.2
).
5. Rotate the drive cage to its upright position by pulling on the green-tabbed lip.
6. Disconnect the signal
1
and power
2
cables from the drive. The other end of the cables
should remain connected to the system board. (Diskette drive is shown.)
7. Rotate the drive cage down to its normal position before trying to remove the drive.