HP dx7300 HP Compaq dx7300 Business PC Service Reference Guide, 1st Edition - Page 125
HP dx7300 - Microtower PC Manual
 |
View all HP dx7300 manuals
Add to My Manuals
Save this manual to your list of manuals |
Page 125 highlights
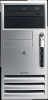
Removal and Replacement Procedures- Slim Tower (ST) Chassis 7. Remove the SmartCover lock from the backwall of the chassis using the special security wrench and disconnect its cable from the system board. (Section 7.2) 8. Disconnect the data and power cables from the system board. 9. Disconnect the "Serial A" cable from the system board, remove the two screws that secure the serial connector to the backwall, then remove the serial connector. 10. Remove the fan shroud by lifting it up and out (Section 7.12). 11. Remove the chassis fan (Section 7.18) Service Reference Guide, dx7300 433611-001 7-19
-
 1
1 -
2
-
3
-
4
-
5
-
6
-
7
-
8
-
9
-
10
-
11
-
12
-
13
-
14
-
15
-
16
-
17
-
18
-
19
-
20
-
21
-
22
-
23
-
24
-
25
-
26
-
27
-
28
-
29
-
30
-
31
-
32
-
33
-
34
-
35
-
36
-
37
-
38
-
39
-
40
-
41
-
42
-
43
-
44
-
45
-
46
-
47
-
48
-
49
-
50
-
51
-
52
-
53
-
54
-
55
-
56
-
57
-
58
-
59
-
60
-
61
-
62
-
63
-
64
-
65
-
66
-
67
-
68
-
69
-
70
-
71
-
72
-
73
-
74
-
75
-
76
-
77
-
78
-
79
-
80
-
81
-
82
-
83
-
84
-
85
-
86
-
87
-
88
-
89
-
90
-
91
-
92
-
93
-
94
-
95
-
96
-
97
-
98
-
99
-
100
-
101
-
102
-
103
-
104
-
105
-
106
-
107
-
108
-
109
-
110
-
111
-
112
-
113
-
114
-
115
-
116
-
117
-
118
-
119
-
 120
120 -
 121
121 -
 122
122 -
 123
123 -
 124
124 -
 125
125 -
 126
126 -
 127
127 -
 128
128 -
 129
129 -
 130
130 -
131
-
132
-
133
-
134
-
135
-
136
-
137
-
138
-
139
-
140
-
141
-
142
-
143
-
144
-
145
-
146
-
147
-
148
-
149
-
150
-
151
-
152
-
153
-
154
-
155
-
156
-
157
-
158
-
159
-
160
-
161
-
162
-
163
-
164
-
165
-
166
-
167
-
168
-
169
-
170
-
171
-
172
-
173
-
174
-
175
-
176
-
177
-
178
-
179
-
180
-
181
-
182
-
183
-
184
-
185
-
186
-
187
-
188
-
189
-
190
-
191
-
192
-
193
-
194
-
195
-
196
-
197
-
198
-
199
-
200
-
201
-
202
-
203
-
204
-
205
-
206
-
207
-
208
-
209
-
210
-
211
-
212
-
213
-
214
-
215
-
216
-
217
-
218
-
219
-
220
-
221
-
222
-
223
-
224
-
225
-
226
-
227
-
228
-
229
-
230
-
231
-
232
-
233
-
234
 |
 |
Service Reference Guide, dx7300
433611-001
7–19
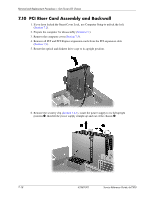
Removal and Replacement Procedures— Slim Tower (ST) Chassis
7. Remove the SmartCover lock from the backwall of the chassis using the special security
wrench and disconnect its cable from the system board. (
Section 7.2
)
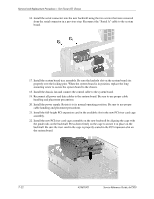
8. Disconnect the data and power cables from the system board.
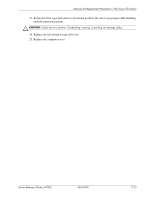
9. Disconnect the “Serial A” cable from the system board, remove the two screws that secure
the serial connector to the backwall, then remove the serial connector.
10. Remove the fan shroud by lifting it up and out (
Section 7.12
).
11. Remove the chassis fan (
Section 7.18
)