Hitachi VT-F462A Owners Guide - Page 61
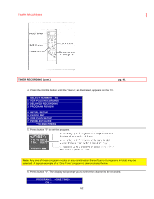
START ON TIME, STOP OFF TIME, DAY etc. See below.
 |
View all Hitachi VT-F462A manuals
Add to My Manuals
Save this manual to your list of manuals |
Page 61 highlights
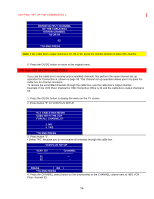
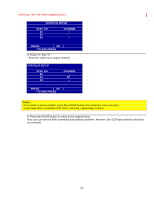
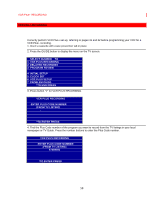
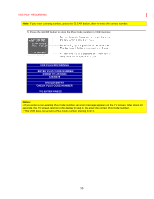
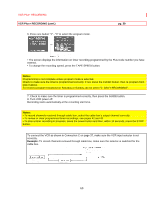
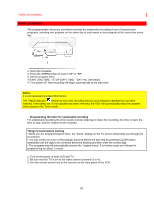
TIMER RECORDING TIMER RECORDING The programmable electronic clock/timer permits the unattended recording of up to 8 preselected programs, including one program on the same day of each week or one program at the same time every day. 1. Insert the Cassette. 2. Press the SPEED button to select "SP" or "EP". 3. Set the program timer. "START (ON) TIME", "STOP (OFF) TIME", "DAY" etc. See below. 4. Turn power off. Now recording will begin automatically at the start time. Notes: It is not necessary to press REC button. The TIMER indicator flashes to warn that recording will not occur because cassette has not been inserted. If the safety tab on the cassette has been removed, the VCR will automatically eject the cassette when placed in the Timer mode. Programming the timer for unattended recording For unattended recording the timer needs to know what day to make the recording, the time to start, the time to stop, and the channel to be recorded. Things to know before starting • While you are programming the timer, the "menu" display on the TV screen will prompt you through the procedures. • You can correct an error in the program any time before the last step by pressing CLEAR button repeatedly until the digit to be corrected becomes flashing and then enter the correct digit. • The programming will automatically resume the "original menu" if no further steps are followed in programming for about 1 minute. 1. Turn on the power of both VCR and TV. 2. Be sure that the TV is set to the video channel (channel 3 or 4). 3. Aim the remote control unit at the receiver on the front panel of the VCR. 61
-
 1
1 -
2
-
3
-
4
-
5
-
6
-
7
-
8
-
9
-
10
-
11
-
12
-
13
-
14
-
15
-
16
-
17
-
18
-
19
-
20
-
21
-
22
-
23
-
24
-
25
-
26
-
27
-
28
-
29
-
30
-
31
-
32
-
33
-
34
-
35
-
36
-
37
-
38
-
39
-
40
-
41
-
42
-
43
-
44
-
45
-
46
-
47
-
48
-
49
-
50
-
51
-
52
-
53
-
54
-
55
-
 56
56 -
 57
57 -
 58
58 -
 59
59 -
 60
60 -
 61
61 -
 62
62 -
 63
63 -
 64
64 -
 65
65 -
 66
66 -
67
-
68
-
69
-
70
-
71
-
72
-
73
-
74
-
75
-
76
-
77
-
78
-
79
-
80
-
81
-
82
-
83
-
84
 |
 |
