IBM 17231RX Installation Guide - Page 28
connecting
 |
UPC - 000435862730
View all IBM 17231RX manuals
Add to My Manuals
Save this manual to your list of manuals |
Page 28 highlights
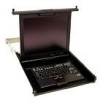
3. Route the power, video, and keyboard-and-mouse cables through the channel in the mounting bracket on the left side of the console switch, and then connect the video, keyboard, and mouse connectors to the console switch. 4. See the documentation that comes with the console switch for information about connecting the flat-panel display, thin keyboard, and servers to the console switch. 18 1U 17-inch Flat Panel Console Kit: Installation and Maintenance Guide
-
 1
1 -
2
-
3
-
4
-
5
-
6
-
7
-
8
-
9
-
10
-
11
-
12
-
13
-
14
-
15
-
16
-
17
-
18
-
19
-
20
-
21
-
22
-
 23
23 -
 24
24 -
 25
25 -
 26
26 -
 27
27 -
 28
28 -
 29
29 -
 30
30 -
 31
31 -
 32
32 -
 33
33 -
34
-
35
-
36
-
37
-
38
-
39
-
40
-
41
-
42
-
43
-
44
-
45
-
46
-
47
-
48
-
49
-
50
-
51
-
52
-
53
-
54
-
55
-
56
-
57
-
58
-
59
-
60
-
61
-
62
-
63
-
64
-
65
-
66
-
67
-
68
-
69
-
70
-
71
-
72
-
73
-
74
-
75
-
76
-
77
-
78
-
79
-
80
-
81
-
82
-
83
-
84
-
85
-
86
-
87
-
88
-
89
-
90
-
91
-
92
 |
 |

3.
Route
the
power,
video,
and
keyboard-and-mouse
cables
through
the
channel
in
the
mounting
bracket
on
the
left
side
of
the
console
switch,
and
then
connect
the
video,
keyboard,
and
mouse
connectors
to
the
console
switch.
4.
See
the
documentation
that
comes
with
the
console
switch
for
information
about
connecting
the
flat-panel
display,
thin
keyboard,
and
servers
to
the
console
switch.
18
1U
17-inch
Flat
Panel
Console
Kit:
Installation
and
Maintenance
Guide