IBM 17231RX Installation Guide - Page 40
interferes
 |
UPC - 000435862730
View all IBM 17231RX manuals
Add to My Manuals
Save this manual to your list of manuals |
Page 40 highlights
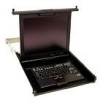
10. Carefully route the keyboard-and-mouse cable from the new keyboard down through the keyboard tray opening, up through the opening on the right side of the tray, and toward the cable-management arm. Pull the full length of the cable through the opening. 11. Place the keyboard in the tray and press the hook-and-loop fasteners together. Attention: When you route the keyboard-and-mouse cable, make sure that the cable does not hang below the underside of the keyboard where it might be damaged if it interferes with the devices in the rack space below the console unit. 30 1U 17-inch Flat Panel Console Kit: Installation and Maintenance Guide
-
 1
1 -
2
-
3
-
4
-
5
-
6
-
7
-
8
-
9
-
10
-
11
-
12
-
13
-
14
-
15
-
16
-
17
-
18
-
19
-
20
-
21
-
22
-
23
-
24
-
25
-
26
-
27
-
28
-
29
-
30
-
31
-
32
-
33
-
34
-
 35
35 -
 36
36 -
 37
37 -
 38
38 -
 39
39 -
 40
40 -
 41
41 -
 42
42 -
 43
43 -
 44
44 -
 45
45 -
46
-
47
-
48
-
49
-
50
-
51
-
52
-
53
-
54
-
55
-
56
-
57
-
58
-
59
-
60
-
61
-
62
-
63
-
64
-
65
-
66
-
67
-
68
-
69
-
70
-
71
-
72
-
73
-
74
-
75
-
76
-
77
-
78
-
79
-
80
-
81
-
82
-
83
-
84
-
85
-
86
-
87
-
88
-
89
-
90
-
91
-
92
 |
 |

10.
Carefully
route
the
keyboard-and-mouse
cable
from
the
new
keyboard
down
through
the
keyboard
tray
opening,
up
through
the
opening
on
the
right
side
of
the
tray,
and
toward
the
cable-management
arm.
Pull
the
full
length
of
the
cable
through
the
opening.
11.
Place
the
keyboard
in
the
tray
and
press
the
hook-and-loop
fasteners
together.
Attention:
When
you
route
the
keyboard-and-mouse
cable,
make
sure
that
the
cable
does
not
hang
below
the
underside
of
the
keyboard
where
it
might
be
damaged
if
it
interferes
with
the
devices
in
the
rack
space
below
the
console
unit.
30
1U
17-inch
Flat
Panel
Console
Kit:
Installation
and
Maintenance
Guide