IBM 867282X Maintenance Manual - Page 26
When prompted as to whether you want to save the current BIOS code, stop
 |
UPC - 087944650966
View all IBM 867282X manuals
Add to My Manuals
Save this manual to your list of manuals |
Page 26 highlights
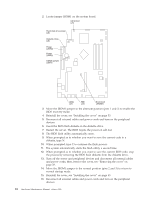
2. Locate jumper JROM1 on the system board. 3. Move the JROM1 jumper to the alternate position (pins 1 and 2) to enable the BIOS recovery mode. 4. Reinstall the cover, see "Installing the cover" on page 53. 5. Reconnect all external cables and power cords and turn on the peripheral devices. 6. Insert the BIOS flash diskette in the diskette drive. 7. Restart the server. The BIOS begins the power-on self-test. 8. The BIOS flash utility automatically starts. 9. When prompted as to whether you want to save the current code to a diskette, type N. 10. When prompted, type Y to continue the flash process. 11. The system automatically starts the flash utility a second time. 12. When prompted as to whether you want to save the current BIOS code, stop the process by removing the BIOS flash diskette from the diskette drive. 13. Turn off the server and peripheral devices and disconnect all external cables and power cords; then, remove the cover, see "Removing the cover" on page 38. 14. Move the JROM1 jumper to the normal position (pins 2 and 3) to return to normal startup mode. 15. Reinstall the cover, see "Installing the cover" on page 53. 16. Reconnect all external cables and power cords and turn on the peripheral devices. 18 Hardware Maintenance Manual: xSeries 300
-
 1
1 -
2
-
3
-
4
-
5
-
6
-
7
-
8
-
9
-
10
-
11
-
12
-
13
-
14
-
15
-
16
-
17
-
18
-
19
-
20
-
 21
21 -
 22
22 -
 23
23 -
 24
24 -
 25
25 -
 26
26 -
 27
27 -
 28
28 -
 29
29 -
 30
30 -
 31
31 -
32
-
33
-
34
-
35
-
36
-
37
-
38
-
39
-
40
-
41
-
42
-
43
-
44
-
45
-
46
-
47
-
48
-
49
-
50
-
51
-
52
-
53
-
54
-
55
-
56
-
57
-
58
-
59
-
60
-
61
-
62
-
63
-
64
-
65
-
66
-
67
-
68
-
69
-
70
-
71
-
72
-
73
-
74
-
75
-
76
-
77
-
78
-
79
-
80
-
81
-
82
-
83
-
84
-
85
-
86
-
87
-
88
-
89
-
90
-
91
-
92
-
93
-
94
-
95
-
96
-
97
-
98
-
99
-
100
-
101
-
102
-
103
-
104
-
105
-
106
-
107
-
108
-
109
-
110
-
111
-
112
-
113
-
114
-
115
-
116
-
117
-
118
-
119
-
120
 |
 |
