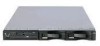
IBM 867282X Maintenance Manual - Page 52
Hard disk drives, Installing or replacing a hard disk drive, Attention, Notes
 |
UPC - 087944650966
View all IBM 867282X manuals
Add to My Manuals
Save this manual to your list of manuals |
Page 52 highlights
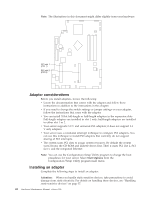
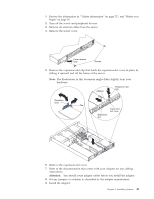
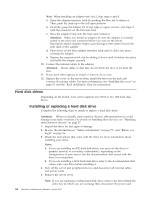
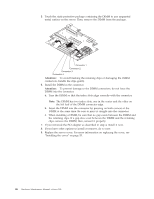
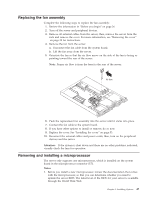
Note: When installing an adapter into slot 2, skip steps a and d. a. Open the adapter-retention latch by pushing the blue tab to release it. Then, push the latch up to the full open position. b. Carefully grasp the adapter by its top edge or upper corners, and align it with the connector on the PCI riser-card. c. Press the adapter firmly into the riser card connector. Attention: When you install an adapter, be sure the adapter is correctly seated in the riser-card connector before you turn on the server. Improperly seated adapters might cause damage to the system board, the riser card, or the adapter. d. Push down on the blue adapter retention latch until it clicks into place, securing the adapter. e. Replace the expansion-slot clip by sliding it down until it latches into place and holds the adapter securely. 10. Connect the internal cables to the adapter. Attention: Route cables so that they do not block the flow of air from the fans. 11. If you have other options to install or remove, do so now. 12. Replace the cover on the server; then, install the server in the rack and connect all external cables. For more information, see "Installing the cover" on page 53, and the ″Rack installation″ flyer for instructions. Hard disk drives Depending on the model, your server supports two SCSI or two IDE hard disk drives. Installing or replacing a hard disk drive Complete the following steps to install or replace a hard disk drive: Attention: When you handle static-sensitive devices, take precautions to avoid damage from static electricity. For details on handling these devices, see "Handling static-sensitive devices" on page 37. 1. Inspect the drive for any signs of damage. 2. Review the information in ″"Safety information" on page 75″, and "Before you begin" on page 36. 3. Check the instructions that come with the drive for more information about installing your drive. Notes: a. If you are installing an IDE hard disk drive, you must set the drive to primary (master) or secondary (subordinate), depending on the configuration of your server. See the documentation that comes with the drive for instructions. b. If you are installing a SCSI hard disk drive, refer to the documentation that comes with your drive before installing it. 4. Turn off the server and peripheral devices and disconnect all external cables and power cords. 5. Remove the server cover. Note: If you are replacing a failing hard disk drive, remove the fans behind the drive bay in which you are working; then, disconnect the power and 44 Hardware Maintenance Manual: xSeries 300
-
 1
1 -
2
-
3
-
4
-
5
-
6
-
7
-
8
-
9
-
10
-
11
-
12
-
13
-
14
-
15
-
16
-
17
-
18
-
19
-
20
-
21
-
22
-
23
-
24
-
25
-
26
-
27
-
28
-
29
-
30
-
31
-
32
-
33
-
34
-
35
-
36
-
37
-
38
-
39
-
40
-
41
-
42
-
43
-
44
-
45
-
46
-
 47
47 -
 48
48 -
 49
49 -
 50
50 -
 51
51 -
 52
52 -
 53
53 -
 54
54 -
 55
55 -
 56
56 -
 57
57 -
58
-
59
-
60
-
61
-
62
-
63
-
64
-
65
-
66
-
67
-
68
-
69
-
70
-
71
-
72
-
73
-
74
-
75
-
76
-
77
-
78
-
79
-
80
-
81
-
82
-
83
-
84
-
85
-
86
-
87
-
88
-
89
-
90
-
91
-
92
-
93
-
94
-
95
-
96
-
97
-
98
-
99
-
100
-
101
-
102
-
103
-
104
-
105
-
106
-
107
-
108
-
109
-
110
-
111
-
112
-
113
-
114
-
115
-
116
-
117
-
118
-
119
-
120
 |
 |
