IBM 867282X Maintenance Manual - Page 65
Power supply - AC, Power supply - DC, Before you begin, Wiring the – 48 V dc power connection to
 |
UPC - 087944650966
View all IBM 867282X manuals
Add to My Manuals
Save this manual to your list of manuals |
Page 65 highlights
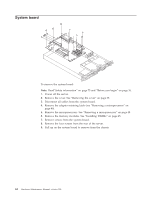
Power supply - AC To remove the power supply: Note: Read"Safety information" on page 75 and "Before you begin" on page 36. 1. Power off the server. 2. Remove the cover. See "Removing the cover" on page 38. 3. Disconnect the cables that connect the power supply to the system board. 4. Remove the screws (2) from the side of the chassis. 5. Remove the screws at the back of the chassis and power supply. 6. Slide the power supply away from the side of the chassis and lift up to remove. Power supply - DC Use this documentation in conjunction with the xSeries documentation that comes with your server. The information contained in this document replaces the instructions for connecting and disconnecting the power cable from the rear of your server in your xSeries documentation. Before you begin v Read this publication completely before making the power connections. v Review the safety statements Wiring the - 48 V dc power connection to the power supply The information in this section replaces the instructions for connecting the power cable to the rear of the server in your xSeries documentation. Notes: 1. There are two sets of terminals for connecting dc power connections to the rear of the server. As shown in the following illustration, they are labeled A and B on the terminal block cover. Each set consists of a return or 0 V (+) terminal and a - 48 V (-) terminal. 2. For instructions on how to connect dual inputs to the terminal block, refer to "Dual input instructions" on page 60. Chapter 6. FRU information (service only) 57
-
 1
1 -
2
-
3
-
4
-
5
-
6
-
7
-
8
-
9
-
10
-
11
-
12
-
13
-
14
-
15
-
16
-
17
-
18
-
19
-
20
-
21
-
22
-
23
-
24
-
25
-
26
-
27
-
28
-
29
-
30
-
31
-
32
-
33
-
34
-
35
-
36
-
37
-
38
-
39
-
40
-
41
-
42
-
43
-
44
-
45
-
46
-
47
-
48
-
49
-
50
-
51
-
52
-
53
-
54
-
55
-
56
-
57
-
58
-
59
-
 60
60 -
 61
61 -
 62
62 -
 63
63 -
 64
64 -
 65
65 -
 66
66 -
 67
67 -
 68
68 -
 69
69 -
 70
70 -
71
-
72
-
73
-
74
-
75
-
76
-
77
-
78
-
79
-
80
-
81
-
82
-
83
-
84
-
85
-
86
-
87
-
88
-
89
-
90
-
91
-
92
-
93
-
94
-
95
-
96
-
97
-
98
-
99
-
100
-
101
-
102
-
103
-
104
-
105
-
106
-
107
-
108
-
109
-
110
-
111
-
112
-
113
-
114
-
115
-
116
-
117
-
118
-
119
-
120
 |
 |
