IBM 8840 Hardware Maintenance Manual - Page 50
connectors, Group, Active, Online-spare, memory
 |
UPC - 000435863799
View all IBM 8840 manuals
Add to My Manuals
Save this manual to your list of manuals |
Page 50 highlights
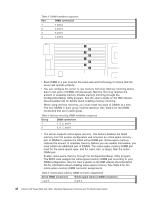
Table 3. DIMM installation sequence Pair DIMM connectors 1 1 and 2 2 3 and 4 3 5 and 6 4 7 and 8 v Each DIMM in a pair must be the same size and technology to ensure that the server will operate properly. v You can configure the server to use memory mirroring. Memory mirroring stores data in two pairs of DIMMs simultaneously. Memory mirroring reduces the amount of available memory. Enable memory mirroring through the Configuration/Setup Utility program. See the User's Guide on the IBM xSeries Documentation CD for details about enabling memory mirroring. When using memory mirroring, you must install two pairs of DIMMs at a time. The four DIMMs in each group must be identical. See Table 4 for the DIMM connectors that are in each group. Table 4. Memory mirroring DIMM installation sequence Group DIMM connectors 1 1, 2, 3, and 4 2 5, 6, 7, and 8 v The server supports online-spare memory. This feature disables the failed memory from the system configuration and activates an online-spare memory pair of DIMMs to replace the failed active DIMM pair. Online-spare memory reduces the amount of available memory. Before you can enable this feature, you must install one additional pair of DIMMs. The online-spare memory DIMM pair must be the same speed, type, and the same size, or larger, than the active DIMM pair. Enable online-spare memory through the Configuration/Setup Utility program. The BIOS code assigns the online-spare memory DIMM pair according to your DIMM configuration. See the User's Guide on the IBM xSeries Documentation CD for information about enabling online-spare memory. See Table 5 for the online-spare memory DIMM connector assignments. Table 5. Online-spare memory DIMM connector assignments Active DIMM connectors Online-spare memory DIMM connectors 1 and 2 3 and 4 40 xSeries 346 Types 8840 and 1880: Hardware Maintenance Manual and Troubleshooting Guide
-
 1
1 -
2
-
3
-
4
-
5
-
6
-
7
-
8
-
9
-
10
-
11
-
12
-
13
-
14
-
15
-
16
-
17
-
18
-
19
-
20
-
21
-
22
-
23
-
24
-
25
-
26
-
27
-
28
-
29
-
30
-
31
-
32
-
33
-
34
-
35
-
36
-
37
-
38
-
39
-
40
-
41
-
42
-
43
-
44
-
 45
45 -
 46
46 -
 47
47 -
 48
48 -
 49
49 -
 50
50 -
 51
51 -
 52
52 -
 53
53 -
 54
54 -
 55
55 -
56
-
57
-
58
-
59
-
60
-
61
-
62
-
63
-
64
-
65
-
66
-
67
-
68
-
69
-
70
-
71
-
72
-
73
-
74
-
75
-
76
-
77
-
78
-
79
-
80
-
81
-
82
-
83
-
84
-
85
-
86
-
87
-
88
-
89
-
90
-
91
-
92
-
93
-
94
-
95
-
96
-
97
-
98
-
99
-
100
-
101
-
102
-
103
-
104
-
105
-
106
-
107
-
108
-
109
-
110
-
111
-
112
-
113
-
114
-
115
-
116
-
117
-
118
-
119
-
120
-
121
-
122
-
123
-
124
-
125
-
126
-
127
-
128
-
129
-
130
-
131
-
132
-
133
-
134
-
135
-
136
-
137
-
138
-
139
-
140
-
141
-
142
-
143
-
144
-
145
-
146
-
147
-
148
-
149
-
150
-
151
-
152
-
153
-
154
-
155
-
156
-
157
-
158
-
159
-
160
-
161
-
162
-
163
-
164
-
165
-
166
-
167
-
168
-
169
-
170
-
171
-
172
-
173
-
174
-
175
-
176
 |
 |
