IBM 8862 Hardware Maintenance Manual - Page 44
Configuration/Setup
 |
UPC - 000435172679
View all IBM 8862 manuals
Add to My Manuals
Save this manual to your list of manuals |
Page 44 highlights
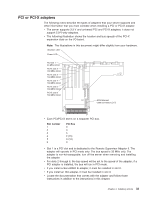
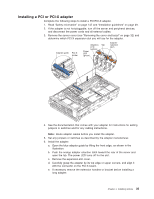
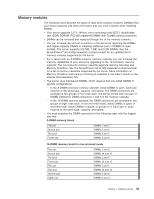
v If you need to change switch settings or jumper settings on the adapter, follow the instructions that come with the adapter. v The server scans devices and PCI-X slots to assign system resources in the following order: CD-ROM drive; disk drives; integrated Ethernet controller; integrated SCSI devices; and PCI-X slots 1, 2, 3, 4, 5, and 6. If an RXE-100 enclosure is attached to the server, the scan continues in sequence with PCI slots 7, 8, 9, 10, 11, 12, 13, 14, 15, 16, 17, and 18. Note: You can use the Configuration/Setup Utility program to change the sequence and have the server scan one of the first six PCI slots before it scans the integrated devices. You cannot change the scan sequence of the PCI slots in an RXE-100 enclosure. v The PCI-X slot numbers in an RXE-100 enclosure are assigned in the following order: Slots in RXE-100 enclosure Slot numbers assigned Slot numbers assigned to A side to B side 6 slots on A side only 7 - 12* (A1 - A6) none 6 slots on B side only none 7 - 12* (B1 - B6) 12 slots 7 - 12 (A1 - A6) 13 - 18 (B1 - B6) * Both sides are numbered 7-12 when an RXE-100 enclosure is shared. v If you install a RAID adapter other than a ServeRAID 6i adapter to control internal hot-swap hard disk drives, you might need to disconnect the internal channel cable from the SCSI RAID cable connector (J17) on the I/O board and connect it to the RAID adapter. No recabling is needed for a ServeRAID 6i adapter. See the information that comes with your RAID adapter. v If you install a RAID adapter to control external hard disk drives, connect one end of the RAID external channel cable (separately orderable) to an external channel connector on the edge of the RAID adapter that is accessible from the rear of the server; then, route the cable to the external SCSI device and connect it to the applicable connector. Note: See the documentation that comes with the RAID adapter for any additional cabling instructions. That documentation also provides information about installing the RAID software and configuring the RAID adapter. For a list of supported RAID adapters, go to http://www.ibm.com/pc/us/compat/. v Before attempting to install a new adapter, make sure that there is an available slot at the correct bus speed for it. If you need additional PCI-X slots, you can purchase a remote I/O expansion enclosure through your IBM marketing representative or authorized reseller. Notes: 1. Before hot-swapping any PCI-X adapters, read the information in "Working inside a server with power on" on page 30. 2. For hot-pluggable adapters, make sure that the PCI hot-plug device driver is installed. For details, see the documentation that comes with the adapter. 3. For information on cabling the Remote Supervisor Adapter II and on updating its software and firmware, see the User's Guide on the IBM xSeries Documentation CD. 34 IBM xSeries 365 Types 8861, 8862: Hardware Maintenance Manual and Troubleshooting Guide
-
 1
1 -
2
-
3
-
4
-
5
-
6
-
7
-
8
-
9
-
10
-
11
-
12
-
13
-
14
-
15
-
16
-
17
-
18
-
19
-
20
-
21
-
22
-
23
-
24
-
25
-
26
-
27
-
28
-
29
-
30
-
31
-
32
-
33
-
34
-
35
-
36
-
37
-
38
-
 39
39 -
 40
40 -
 41
41 -
 42
42 -
 43
43 -
 44
44 -
 45
45 -
 46
46 -
 47
47 -
 48
48 -
 49
49 -
50
-
51
-
52
-
53
-
54
-
55
-
56
-
57
-
58
-
59
-
60
-
61
-
62
-
63
-
64
-
65
-
66
-
67
-
68
-
69
-
70
-
71
-
72
-
73
-
74
-
75
-
76
-
77
-
78
-
79
-
80
-
81
-
82
-
83
-
84
-
85
-
86
-
87
-
88
-
89
-
90
-
91
-
92
-
93
-
94
-
95
-
96
-
97
-
98
-
99
-
100
-
101
-
102
-
103
-
104
-
105
-
106
-
107
-
108
-
109
-
110
-
111
-
112
-
113
-
114
-
115
-
116
-
117
-
118
-
119
-
120
-
121
-
122
-
123
-
124
-
125
-
126
-
127
-
128
-
129
-
130
-
131
-
132
-
133
-
134
-
135
-
136
-
137
-
138
-
139
-
140
-
141
-
142
-
143
-
144
-
145
-
146
-
147
-
148
-
149
-
150
-
151
-
152
-
153
-
154
-
155
-
156
-
157
-
158
-
159
-
160
-
161
-
162
-
163
-
164
-
165
-
166
-
167
-
168
-
169
-
170
-
171
-
172
-
173
-
174
-
175
-
176
-
177
-
178
-
179
-
180
-
181
-
182
-
183
-
184
-
185
-
186
-
187
-
188
-
189
-
190
-
191
-
192
-
193
-
194
-
195
-
196
-
197
-
198
-
199
-
200
-
201
-
202
-
203
-
204
-
205
-
206
-
207
-
208
-
209
-
210
-
211
-
212
 |
 |