IBM 8862 Hardware Maintenance Manual - Page 51
installation
 |
UPC - 000435172679
View all IBM 8862 manuals
Add to My Manuals
Save this manual to your list of manuals |
Page 51 highlights
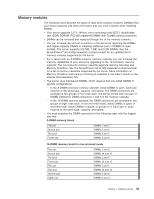
16-DIMM memory board Bank 1 Bank 3 Bank 5 Bank 7 Bank 2 Bank 4 Bank 6 Bank 8 Port 2 Port 1 When you restart the server after adding or removing a pair or quad of DIMMs, the server displays a message that the memory configuration has changed. DIMM installation Complete the following steps to install DIMMs: Note: Depending on the model, the memory cassette in your server might not have doors; this is normal. If the memory cassette has no doors, disregard any instructions to open or close the doors. 1. Read "Safety information" on page 147, "Installation guidelines" on page 29, and the documentation that comes with the DIMMs. 2. Turn off the server and peripheral devices, and disconnect the power cords and all external cables. Remove the top cover (see "Removing the cover and bezel" on page 32). 3. Open the two DIMM access doors on the top of the memory cassette. Chapter 4. Installing options 41
-
 1
1 -
2
-
3
-
4
-
5
-
6
-
7
-
8
-
9
-
10
-
11
-
12
-
13
-
14
-
15
-
16
-
17
-
18
-
19
-
20
-
21
-
22
-
23
-
24
-
25
-
26
-
27
-
28
-
29
-
30
-
31
-
32
-
33
-
34
-
35
-
36
-
37
-
38
-
39
-
40
-
41
-
42
-
43
-
44
-
45
-
 46
46 -
 47
47 -
 48
48 -
 49
49 -
 50
50 -
 51
51 -
 52
52 -
 53
53 -
 54
54 -
 55
55 -
 56
56 -
57
-
58
-
59
-
60
-
61
-
62
-
63
-
64
-
65
-
66
-
67
-
68
-
69
-
70
-
71
-
72
-
73
-
74
-
75
-
76
-
77
-
78
-
79
-
80
-
81
-
82
-
83
-
84
-
85
-
86
-
87
-
88
-
89
-
90
-
91
-
92
-
93
-
94
-
95
-
96
-
97
-
98
-
99
-
100
-
101
-
102
-
103
-
104
-
105
-
106
-
107
-
108
-
109
-
110
-
111
-
112
-
113
-
114
-
115
-
116
-
117
-
118
-
119
-
120
-
121
-
122
-
123
-
124
-
125
-
126
-
127
-
128
-
129
-
130
-
131
-
132
-
133
-
134
-
135
-
136
-
137
-
138
-
139
-
140
-
141
-
142
-
143
-
144
-
145
-
146
-
147
-
148
-
149
-
150
-
151
-
152
-
153
-
154
-
155
-
156
-
157
-
158
-
159
-
160
-
161
-
162
-
163
-
164
-
165
-
166
-
167
-
168
-
169
-
170
-
171
-
172
-
173
-
174
-
175
-
176
-
177
-
178
-
179
-
180
-
181
-
182
-
183
-
184
-
185
-
186
-
187
-
188
-
189
-
190
-
191
-
192
-
193
-
194
-
195
-
196
-
197
-
198
-
199
-
200
-
201
-
202
-
203
-
204
-
205
-
206
-
207
-
208
-
209
-
210
-
211
-
212
 |
 |
