IBM 8862 Hardware Maintenance Manual - Page 52
Attention
 |
UPC - 000435172679
View all IBM 8862 manuals
Add to My Manuals
Save this manual to your list of manuals |
Page 52 highlights
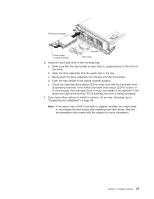
DCAC PS2 PS1 4. Open the retaining clip on each end of the DIMM connector. Attention: To avoid breaking the DIMM retaining clips or damaging the DIMM connectors, open and close the clips gently. 5. Touch the static-protective package that contains the DIMM option to any unpainted metal surface on the server. Then, remove the DIMM from the package. 6. Turn the DIMM so that the DIMM keys align correctly with the slot. Note: The following illustration shows installing DIMMs in an 8-DIMM-connector memory board. 42 IBM xSeries 365 Types 8861, 8862: Hardware Maintenance Manual and Troubleshooting Guide
-
 1
1 -
2
-
3
-
4
-
5
-
6
-
7
-
8
-
9
-
10
-
11
-
12
-
13
-
14
-
15
-
16
-
17
-
18
-
19
-
20
-
21
-
22
-
23
-
24
-
25
-
26
-
27
-
28
-
29
-
30
-
31
-
32
-
33
-
34
-
35
-
36
-
37
-
38
-
39
-
40
-
41
-
42
-
43
-
44
-
45
-
46
-
 47
47 -
 48
48 -
 49
49 -
 50
50 -
 51
51 -
 52
52 -
 53
53 -
 54
54 -
 55
55 -
 56
56 -
 57
57 -
58
-
59
-
60
-
61
-
62
-
63
-
64
-
65
-
66
-
67
-
68
-
69
-
70
-
71
-
72
-
73
-
74
-
75
-
76
-
77
-
78
-
79
-
80
-
81
-
82
-
83
-
84
-
85
-
86
-
87
-
88
-
89
-
90
-
91
-
92
-
93
-
94
-
95
-
96
-
97
-
98
-
99
-
100
-
101
-
102
-
103
-
104
-
105
-
106
-
107
-
108
-
109
-
110
-
111
-
112
-
113
-
114
-
115
-
116
-
117
-
118
-
119
-
120
-
121
-
122
-
123
-
124
-
125
-
126
-
127
-
128
-
129
-
130
-
131
-
132
-
133
-
134
-
135
-
136
-
137
-
138
-
139
-
140
-
141
-
142
-
143
-
144
-
145
-
146
-
147
-
148
-
149
-
150
-
151
-
152
-
153
-
154
-
155
-
156
-
157
-
158
-
159
-
160
-
161
-
162
-
163
-
164
-
165
-
166
-
167
-
168
-
169
-
170
-
171
-
172
-
173
-
174
-
175
-
176
-
177
-
178
-
179
-
180
-
181
-
182
-
183
-
184
-
185
-
186
-
187
-
188
-
189
-
190
-
191
-
192
-
193
-
194
-
195
-
196
-
197
-
198
-
199
-
200
-
201
-
202
-
203
-
204
-
205
-
206
-
207
-
208
-
209
-
210
-
211
-
212
 |
 |

AC
DC
PS2
PS1
4.
Open
the
retaining
clip
on
each
end
of
the
DIMM
connector.
Attention:
To
avoid
breaking
the
DIMM
retaining
clips
or
damaging
the
DIMM
connectors,
open
and
close
the
clips
gently.
5.
Touch
the
static-protective
package
that
contains
the
DIMM
option
to
any
unpainted
metal
surface
on
the
server.
Then,
remove
the
DIMM
from
the
package.
6.
Turn
the
DIMM
so
that
the
DIMM
keys
align
correctly
with
the
slot.
Note:
The
following
illustration
shows
installing
DIMMs
in
an
8-DIMM-connector
memory
board.
42
IBM
xSeries
365
Types
8861,
8862:
Hardware
Maintenance
Manual
and
Troubleshooting
Guide