Insignia NS-R5101AHD-A User Manual (English) - Page 17
Installing batteries in the remote control - help
 |
UPC - 600603128851
View all Insignia NS-R5101AHD-A manuals
Add to My Manuals
Save this manual to your list of manuals |
Page 17 highlights
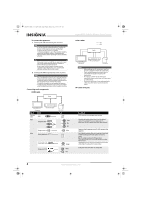
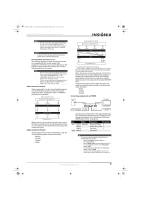
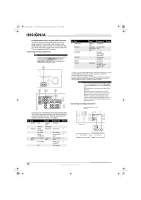
NS-R5101AHD-A_10-0487_MAN_.book Page 13 Friday, May 7, 2010 7:51 AM Insignia NS-R5101AHD-A AV Home Theater Receiver Sender ZONE2 STEREO ON ZONE2 STEREO OFF Surround ON Surround OFF Subwoofer ON Subwoofer OFF Signal Status ZONE2 STEREO is ON ZONE2 STEREO is OFF Surround signal is ON Surround signal is OFF Subwoofer signal is ON Subwoofer signal is OFF Note Set the Sender signals to OFF for any signals (Zone2, Surround, or Subwoofer) that you are not using. Establishing communications Note Every Rocketboost™ network must contain a device called a Hub, which directs network data traffic and helps devices join the network. The network can have only one hub, which is selected using the Hub Status switch on the back of all Rocketboost™ senders. If you are setting up your network for the first time choose one of your Rocketboost™ senders to be your hub by setting the Hub Status switch to Enable. If you already have a Rocketboost™ network, then set the Hub Status switch on the NS-RB1 to disable. The Status LED lights green for the Rocketboost™ Hub device, and lights blue for all other Rocketboost™ devices. To establish communications: 1 Press the Power button on the NS-RB1 sender/receiver to turn it on. 2 Set the HUB STATUS switch to ENABLE if the sender/receiver is to be used as the network hub, otherwise set to DISABLE. • The power indicator lights green when the HUB STATUS switch is set to ENABLE. • The power indicator lights blue when the HUB STATUS switch is set to DISABLE. Note When the HUB STATUS is set to ENABLE, power remains on when your receiver is off. When the HUB STATUS is set to DISABLE, the power will be off when your receiver is off. 3 Press and hold the Power button on the sender/receiver for more than three seconds to put it into joining mode (it will remain in joining mode for 30 seconds). The power indicator LED starts blinking rapidly. 4 Press the Power/Join button on the sender/receiver device (the one configured as the hub) for more than three seconds, so the sender and receiver will enter joining mode. • When connected, the power indicator on both joining device and the hub will go solid, indicating the device is now connected to the network. • The power indicator lights steadily if the link is activated between both of the units. • The power indicator blinks at a slower rate if the communication link is not successful. Listening to music from other Rocketboost™ products To listen to music: 1 Press the Power button on the NS-RB1 sender/receiver to turn it on. 2 Press the PORT input selector on the remote control. 3 Turn on your other Rocketboost™ sender device (sold seperately) and make sure the audio source connected to that device is active. • The Rx indicator should be lit if a source is active on the network. If not, check to make sure there is an active source. • If there are multiple sources you may need to press the Source button on the NS-RB1 to find the source you wish to listen to. Each press will toggle through the available sources. • You can also select the Rocketboost™ source using the NS-RB1 Source/Setup menu. To do this, press PORT on the remote control to enter the menu. This menu appears on the TV connected to your receiver. Then press or to select the Source you want to listen to and press the ENTER button to select it. Listening to Zone 2 audio from your other Rocketboost™ products To listen to Zone 2 audio from your other Rocketboost™ products: 1 Press the Power button on the NS-RB1 sender/receiver to turn it on. 2 Press Zone 2 on the remote control and then press the input selector on the remote for the source you want to listen to. For example, to listen to the TUNER from zone 2, press Zone 2 and then press TUNER. 3 Use the NEXT SOURCE switch at the receiving Rocketboost™ product to select the audio being sent on Zone 2 from the NS-RB1. Note Use analog input only for Zone2. The audio signal of Zone2 is analog. If the input selector is connected to digital or HDMI input, no sound is produced. Going into standby mode To go to standby mode: • Press the Power button and the standby indicator will light, indicating the device is in sleep mode. Installing batteries in the remote control Cautions • If the remote control doesn't work reliably, try replacing the batteries. • Don't mix new and old batteries or different types of batteries. • If you intend not to use the remote control for a long time, remove the batteries to prevent damage from leakage or corrosion. • Remove expired batteries as soon as possible to prevent damage from leakage or corrosion. www.insigniaproducts.com 13
-
 1
1 -
2
-
3
-
4
-
5
-
6
-
7
-
8
-
9
-
10
-
11
-
 12
12 -
 13
13 -
 14
14 -
 15
15 -
 16
16 -
 17
17 -
 18
18 -
 19
19 -
 20
20 -
 21
21 -
 22
22 -
23
-
24
-
25
-
26
-
27
-
28
-
29
-
30
-
31
-
32
-
33
-
34
-
35
-
36
-
37
-
38
-
39
-
40
-
41
-
42
-
43
-
44
 |
 |
