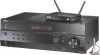
Insignia NS-R5101AHD-A User Manual (English) - Page 25
Setting up Component input, Setting up Digital Audio, Configuring speakers
 |
UPC - 600603128851
View all Insignia NS-R5101AHD-A manuals
Add to My Manuals
Save this manual to your list of manuals |
Page 25 highlights
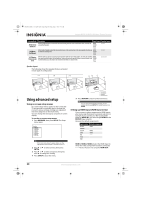
NS-R5101AHD-A_10-0487_MAN_.book Page 21 Friday, May 7, 2010 7:51 AM Insignia NS-R5101AHD-A AV Home Theater Receiver Each HDMI input can only be assigned to a single input selector. When HDMI1 - HDMI3 have already been assigned, you must first set unused input selectors to or you cannot assign HDMI1 HDMI3 to an input selector. Notes • • • When an HDMI IN is assigned to an input selector as explained here, the digital audio input for that input selector is automatically set to the same HDMI IN. If you connect NS-RB1 to the ROCKETBOOST PORT jack, you can not assign any input to the PORT selector. Do not assign the component connected with the HDMI input to a TV/CD selector when you set the TV Control setting to On. Otherwise, the appropriate CEC (Consumer Electronics Control) operation can not be guaranteed. Setting up Component input (Component menu) Tip If you connect NS-RB1 to the ROCKETBOOST PORT jack, you can not assign any input to the PORT selector. If you connect a video component to a component video input, you must assign that input to an input selector. For example, if you connect your Blu-ray Disc/DVD player to COMPONENT VIDEO IN 2, you must assign IN2 to the BD/DVD input selector. Here are the default assignments: Input selector BD/DVD VCR/DVR CBL/SAT GAME AUX TV/CD PORT Default assignment IN1 -----IN2 IN1, IN2-Select the component input to which the video component has been connected. - - - - --Select if you're not using the COMPONENT VIDEO OUT. Setting up Digital Audio (Digital Audio menu) If you connect a component to a digital audio input, you must assign that input to an input selector. For example, if you connect your CD player to the OPTICAL IN 1, you must assign OPT1 to the TV/CD input selector. Here are the default assignments: Input selector BD/DVD VCR/DVR CBL/SAT GAME AUX TV/CD PORT Default assignment COAX ----------OPT1 -----OPT2 ------ COAX, OPT1, OPT2-Select the digital audio input to which the video component has been connected. - - - - --Select if you are using an analog audio input. Notes • • • When an HDMI IN is assigned to an input selector as explained here, the digital audio input for that input selector is automatically set to the same HDMI IN. In addition to the usual inputs, such as COAX, you can also select HDMI inputs. The available sampling rate for PCM signals from a digital input (optical and coaxial) is 32/44.1/48/88.2/96 kHz/16, 20, 24 bit. If you connect NS-RB1 to the ROCKETBOOST PORT jack, you cannot assign any input to the PORT selector. Configuring speakers (Sp Config menu) Note Some of the settings in this section are made automatically by the Audyssey 2EQ® Room Correction and setup function. See "Using the Audyssey 2EQ® room correction and speaker setup" on page 14. This section explains how to specify which speakers are connected and defines their sizes. For speakers with a cone diameter larger than 6.5 inches (16 cm), specify Large (full band). For those with a smaller diameter, specify Small (default crossover 150Hz). The crossover frequency can be changed in the Crossover submenu. Note Speaker Configuration, Crossover Frequency, and Double Bass settings are disabled while headphones are connected, or when Audio TV OUT is set to On. Speaker(s) Subwoofer Front Center and Surround Configuration Yes-if a subwoofer is connected. No-if no subwoofer is connected. Small-If speaker cone is 6.5 inches (16 cm) or less in diameter. Large-If speaker cone is larger than 6.5 inches (16 cm) in diameter. Note: If the Subwoofer setting is No, the default setting for this is Large and cannot be changed. Small-If speaker cone is 6.5 inches (16 cm) or less in diameter. Large-If speaker cone is larger than 6.5 inches (16 cm) in diameter. None-If no center speaker is connected. Note: If the Front setting is Small, the Large option cannot be selected. Setting the crossover frequency (Crossover Frequency submenu of Sp Config menu) This setting is recommended for the speakers that you specify as Small. To get the best bass performance from your speaker system, you need to set the crossover frequency according to the size and frequency response of your speakers. Options include 40Hz, 50Hz, 60Hz, 80Hz, 100Hz, 120Hz, 150Hz, and 200Hz. www.insigniaproducts.com 21
-
 1
1 -
2
-
3
-
4
-
5
-
6
-
7
-
8
-
9
-
10
-
11
-
12
-
13
-
14
-
15
-
16
-
17
-
18
-
19
-
 20
20 -
 21
21 -
 22
22 -
 23
23 -
 24
24 -
 25
25 -
 26
26 -
 27
27 -
 28
28 -
 29
29 -
 30
30 -
31
-
32
-
33
-
34
-
35
-
36
-
37
-
38
-
39
-
40
-
41
-
42
-
43
-
44
 |
 |
