Insignia NS-R5101AHD-A User Manual (English) - Page 9
Setting up your home, theater system
 |
UPC - 600603128851
View all Insignia NS-R5101AHD-A manuals
Add to My Manuals
Save this manual to your list of manuals |
Page 9 highlights
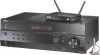
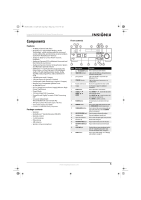
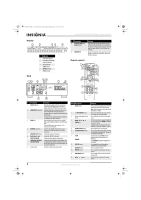
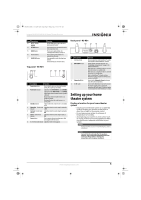
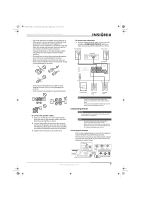
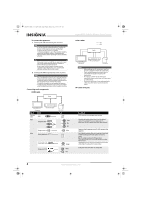
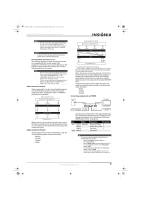
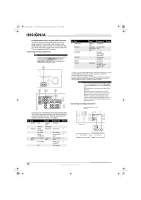
NS-R5101AHD-A_10-0487_MAN_.book Page 5 Friday, May 7, 2010 7:51 AM Insignia NS-R5101AHD-A AV Home Theater Receiver Item Description 13 CH +/- buttons ALBUM 14 RETURN button 15 AUDIO button 16 Number buttons 17 SLEEP/CLR button Function In tuner mode, press to go to the next or previous preset channel. In menu mode, press to return to the main menu or previous menu. Press to access audio settings. See "Changing audio settings" on page 26. Press to enter a preset number or to manually tune the radio. Press repeatedly to select the sleep timer duration. In menu mode, press to clear an entry. Top panel - NS-RB1 12 3 ON/STANDBY STANDBY 4 5 6 78 SOURCE SUBWOOFER SURROUND STEREO # Description Function 1 Power/Join button Press to turn the device on, then hold to initiate joining. Press again to go to standby. 2 Power/Join indicator Lights blue when HUB STATUS is set to DISABLE. Lights green when HUB STATUS is set to ENABLE. Lights steady when the sender/receiver is joined to a network. Blinks slowly when the sender/receiver is not joined to a network. Blinks quickly when the sender/receiver is in joining mode. 3 Standby indicator Lights red when the sender/receiver is in standby mode. 4 Subwoofer - Sender mode Lights blue when the sender setup for subwoofer indicator is ON. 5 Surround - Sender mode Lights blue when the sender setup for surround is indicator ON. 6 Stereo - Sender mode indicator Lights blue when the sender setup for Zone 2 is ON. 7 Source button Press to move to the next receiving source. Each press toggles to the next source. 8 Rx - Receiver mode indicator Lights blue when receiving signals. Back panel - NS-RB1 1 2 3 4 1 DISABLE ENABLE IN HUB STATUS SUBWOOFER # Description 1 External antenna 2 HUB STATUS switch 3 Subwoofer IN jack 4 NS-RB1 cable Function Receives signals from other Rocketboost™ senders. Sends signals to other Rocketboost™ receivers. Enables/disables hub mode operation. See "Establishing communications" on page 13 for additional information. When hub status is enabled, the device is on even when the receiver is in standby mode. When hub status is disabled, the device is off when the receiver is in standby mode. Note: In a Rocketboost™ network, only one Rocketboost™ device should have the Hub Status switch set to ENABLE. Connect to the Subwoofer Preout jack using a mono RCA cable (not provided). Connect to the Rocketboost™ port on the receiver. The receiver supplies power, surround L/R, subwoofer, and Zone2 signals. The device supplies received signals from other Rocketboost™ senders. Setting up your home theater system Finding a location for your home theater system • Install your home theater system on a stable flat surface. Position your receiver so that it has a direct line of sight to the remote control. • Do not expose your system to extremes of temperature or humidity. • Avoid placing your system on a hot surface such as on top of other hot running equipment. Make sure that there is adequate ventilation to your system. Caution Do not install the receiver in a confined space such as a bookcase. Caution Connect the AC cord only after the speakers, antenna, and all optional equipment have been connected. Never make or change any connections with the power turned on. www.insigniaproducts.com 5
-
 1
1 -
2
-
3
-
 4
4 -
 5
5 -
 6
6 -
 7
7 -
 8
8 -
 9
9 -
 10
10 -
 11
11 -
 12
12 -
 13
13 -
 14
14 -
15
-
16
-
17
-
18
-
19
-
20
-
21
-
22
-
23
-
24
-
25
-
26
-
27
-
28
-
29
-
30
-
31
-
32
-
33
-
34
-
35
-
36
-
37
-
38
-
39
-
40
-
41
-
42
-
43
-
44
 |
 |
