Insignia NS-R5101AHD-A User Manual (English) - Page 7
Components - 3d
 |
UPC - 600603128851
View all Insignia NS-R5101AHD-A manuals
Add to My Manuals
Save this manual to your list of manuals |
Page 7 highlights
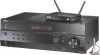
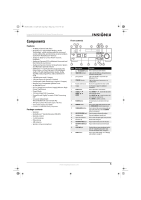
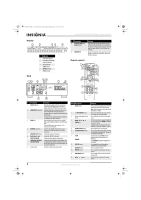
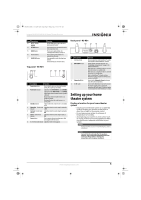
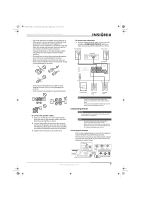
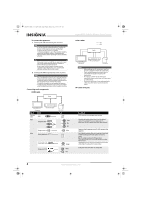
NS-R5101AHD-A_10-0487_MAN_.book Page 3 Friday, May 7, 2010 7:51 AM Insignia NS-R5101AHD-A AV Home Theater Receiver Components Features • 90 Watts/Channel @ 8 ohms • Rocketboost™ Expandable Wireless Audio Technology: sends wireless audio for surround sound, subwoofer, and 2nd zone; receives wireless audio from Rocketboost™ devices • Audyssey 2EQ® to Correct Room Acoustic Problems • Audyssey Dynamic EQ® to Maintain Surround and Bass Detail at any Volume • Audyssey Dynamic Volume to Stop Volume Spikes and Maintain Optimal Volume • HDMI (Ver.1.4 with Audio Return Channel, 3D), Deep-Color, x.v.Color, Lip Sync, DTS-HD Master Audio, DTS-HD High Resolution Audio, Dolby TrueHD, Dolby Digital Plus, DSD and Multi-CH PCM • 3 HDMI Inputs and 1 Output • 3 Digital Inputs (2 Optical/1 Coaxial) • Component Video Switching (2 Inputs/1 Output) • Banana Plug-Compatible Speaker Posts • 40 FM/AM Presets • H.C.P.S. (High Current Power Supply) Massive High Power Transformer • Direct Mode • 192 kHz/24-bit D/A Converters • Powerful and Highly Accurate 32-bit Processing DSP • Crossover Adjustment (40/50/60/80/100/120/150/200 Hz) • A/V Sync Control Function (up to 100 ms) • On-Screen Display via HDMI * "x.v.Color" is a trademark of Sony Corporation. Package contents • Receiver • Rocketboost™ Sender/Receiver (NS-RB1) • Remote control • 2 x AA batteries • FM antenna • AM antenna • Speaker setup microphone Front controls Item Description Function 1 |/ ON/STANDBY button Press to turn on your stereo receiver. 2 HDMI THRU indicator Lights when the HDMI pass-through function is activated in standby mode. 3 Zone 2 indicator Lights when NS-RB1 is connected to the Rocketboost™ Port. 4 STANDBY indicator Lights red when your stereo receiver is in standby mode. 5 Remote control sensor Receives the signal from the remote control. 6 Display See "Display" on page 4 for additional information. 7 SETUP button Press to open the on-screen menus. 8 TUNING / PRESET / ENTER Press TUNING / to tune the radio to the next or previous station. Press PRESET / to tune the radio to the next or previous station preset. Press ENTER to confirm a selection. 9 RETURN button In menu mode, press to return to the main menu. 10 MEMORY button Press to save a radio station preset. Press with the TUNING MODE button to clear presets. 11 TUNING MODE button Press to turn on the receiver tuning mode and listen to the radio. Press with the MEMORY button to clear presets. 12 MASTER VOLUME knob Turn to increase or decrease the volume. 13 Headphone jack Plug your headphones into this jack. 14 Input selector buttons Press to select the input signal source you want. 15 Protective cap Remove when using jack. 16 AUX INPUT VIDEO jack Plug an external video source into this jack. 17 AUX INPUT AUDIO L/R Plug an external sound source into this jack. jacks 18 SETUP MIC jack Plug the Audyssey setup microphone into this jack. See "Using the Audyssey 2EQ® room correction and speaker setup" on page 14. 19 AUDIO button Press to access audio settings. See "Changing audio settings" on page 26. www.insigniaproducts.com 3
-
 1
1 -
 2
2 -
 3
3 -
 4
4 -
 5
5 -
 6
6 -
 7
7 -
 8
8 -
 9
9 -
 10
10 -
 11
11 -
 12
12 -
13
-
14
-
15
-
16
-
17
-
18
-
19
-
20
-
21
-
22
-
23
-
24
-
25
-
26
-
27
-
28
-
29
-
30
-
31
-
32
-
33
-
34
-
35
-
36
-
37
-
38
-
39
-
40
-
41
-
42
-
43
-
44
 |
 |
