Intermec PB51 Fingerprint Developer's Guide (old) - Page 62
Setting the Standard IN and OUT Channels, Input From a Host
 |
View all Intermec PB51 manuals
Add to My Manuals
Save this manual to your list of manuals |
Page 62 highlights
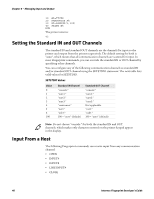
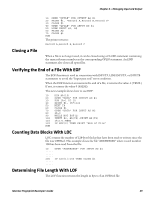
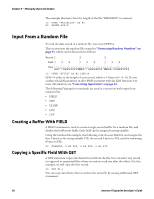
Chapter 4 - Managing Input and Output 10 A%=TICKS 20 RANDOMIZE A% 30 B%=RANDOM(1,100) 40 PRINT B% RUN The printer returns: 42 Setting the Standard IN and OUT Channels The standard IN and standard OUT channels are the channels for input to the printer and output from the printer respectively. The default setting for both is "auto", which means that all communication channels are scanned for input. In most Fingerprint commands, you can override the standard IN or OUT channel by specifying other channels. You can configure any of the following communication channels as standard IN and/or standard OUT channel using the SETSTDIO statement. The next table lists valid values for SETSTDIO. SETSTDIO Values Value 0 1 2 3 4 5 6 100 Standard IN Channel "console:" "uart1:" "uart2:" "uart3:" "centronics:" "net1:" "usb1:" 100 = "auto" (default) Standard OUT Channel "console:" "uart1:" "uart2:" "uart3:" Not applicable. "net1:" "usb1:" 100 = "auto" (default) Note: Do not choose "console:" for both the standard IN and OUT channels, which makes only characters entered on the printer keypad appear in the display. Input From a Host The following Fingerprint commands can receive input from any communication channel: • OPEN • INPUT# • INPUT$ • LINE INPUT# • CLOSE 46 Intermec Fingerprint Developer's Guide
-
 1
1 -
2
-
3
-
4
-
5
-
6
-
7
-
8
-
9
-
10
-
11
-
12
-
13
-
14
-
15
-
16
-
17
-
18
-
19
-
20
-
21
-
22
-
23
-
24
-
25
-
26
-
27
-
28
-
29
-
30
-
31
-
32
-
33
-
34
-
35
-
36
-
37
-
38
-
39
-
40
-
41
-
42
-
43
-
44
-
45
-
46
-
47
-
48
-
49
-
50
-
51
-
52
-
53
-
54
-
55
-
56
-
 57
57 -
 58
58 -
 59
59 -
 60
60 -
 61
61 -
 62
62 -
 63
63 -
 64
64 -
 65
65 -
 66
66 -
 67
67 -
68
-
69
-
70
-
71
-
72
-
73
-
74
-
75
-
76
-
77
-
78
-
79
-
80
-
81
-
82
-
83
-
84
-
85
-
86
-
87
-
88
-
89
-
90
-
91
-
92
-
93
-
94
-
95
-
96
-
97
-
98
-
99
-
100
-
101
-
102
-
103
-
104
-
105
-
106
-
107
-
108
-
109
-
110
-
111
-
112
-
113
-
114
-
115
-
116
-
117
-
118
-
119
-
120
-
121
-
122
-
123
-
124
-
125
-
126
-
127
-
128
-
129
-
130
-
131
-
132
-
133
-
134
-
135
-
136
-
137
-
138
-
139
-
140
-
141
-
142
-
143
-
144
-
145
-
146
-
147
-
148
-
149
-
150
-
151
-
152
-
153
-
154
-
155
-
156
-
157
-
158
-
159
-
160
-
161
-
162
-
163
-
164
-
165
-
166
-
167
-
168
-
169
-
170
-
171
-
172
-
173
-
174
-
175
-
176
-
177
-
178
-
179
-
180
-
181
-
182
-
183
-
184
-
185
-
186
-
187
 |
 |
