Intermec PX4i Intermec Printer Language (IPL) Developer's Guide (old) - Page 28
Magnifying Bar Code Fields, Specifying Data for Fields - print heads
 |
View all Intermec PX4i manuals
Add to My Manuals
Save this manual to your list of manuals |
Page 28 highlights
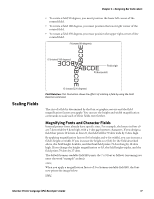
Chapter 2 - Designing Bar Code Labels Increasing the width of a text field to 2 makes each letter in the field twice as wide. If you did this to the example above, with field height h2, the final field would print 158 dots wide by 18 dots high. When you magnify a bitmap font, the edges of the characters become jagged. If you want to print large text characters, use an outline font. Magnifying Bar Code Fields You can also use height and width commands to modify bar code fields, but the commands are defined differently for use with bar codes. For bar code fields, the height magnification is the actual dot height of the bar code. If you set a height magnification of 20, the height of the bar code field will be 20 dots. Printing narrow bar codes conserves space on each label as well as media; however, if you plan to scan bar codes from a distance, you may need to magnify the bar code widths. The width magnification factor for bar code fields refers to the width of the narrowest element of the bar code. When you specify a narrow element width of 3, the width of the narrowest element in the symbology is 3 dots wide. The spaces and large element widths are magnified according to preset ratios for each symbology. Note: You can only print a bar width of 1 if you are printing in drag mode (bars perpendicular to the print head). If you select a width of 1 in picket mode (bars parallel to the print head), the printer defaults to 2. The default height for bar code fields is 50 dots, and the default width for narrow elements is 1 dot. Note: If you are using the POSTNET symbology, follow the rules for magnifying fonts. Specifying Data for Fields After you design a format for a bar code label, you need to provide the data to be printed in human-readable or bar code fields. For human-readable fields, you can specify data in two ways: • You can add the data to the command string that defines that field. This is a good choice for text that is constant from label to label. • You can add command strings after the label format that include the data to be printed. This is a good choice for text that may change from label to label, such as incremental numbering. You need to place the printer into Print mode before adding these command strings. For bar code data, you place the printer into Print mode, and then add command strings that include the data to be printed. 18 Intermec Printer Language (IPL) Developer's Guide
-
 1
1 -
2
-
3
-
4
-
5
-
6
-
7
-
8
-
9
-
10
-
11
-
12
-
13
-
14
-
15
-
16
-
17
-
18
-
19
-
20
-
21
-
22
-
 23
23 -
 24
24 -
 25
25 -
 26
26 -
 27
27 -
 28
28 -
 29
29 -
 30
30 -
 31
31 -
 32
32 -
 33
33 -
34
-
35
-
36
-
37
-
38
-
39
-
40
-
41
-
42
-
43
-
44
-
45
-
46
-
47
-
48
-
49
-
50
-
51
-
52
-
53
-
54
-
55
-
56
-
57
-
58
-
59
-
60
-
61
-
62
-
63
-
64
-
65
-
66
-
67
-
68
-
69
-
70
-
71
-
72
-
73
-
74
-
75
-
76
-
77
-
78
-
79
-
80
-
81
-
82
-
83
-
84
-
85
-
86
-
87
-
88
-
89
-
90
-
91
-
92
-
93
-
94
-
95
-
96
-
97
-
98
-
99
-
100
-
101
-
102
-
103
-
104
-
105
-
106
-
107
-
108
-
109
-
110
-
111
-
112
 |
 |