Intermec PX4i Intermec Printer Language (IPL) Developer's Guide (old) - Page 30
Example Using the “Next Data Entry Field, Select” Command, Label Format Example - Changing Data
 |
View all Intermec PX4i manuals
Add to My Manuals
Save this manual to your list of manuals |
Page 30 highlights
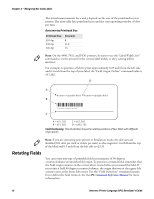
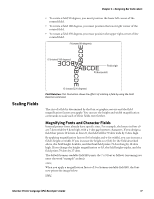
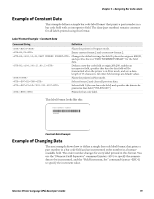
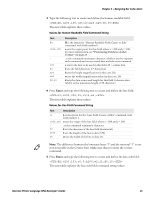
Chapter 2 - Designing Bar Code Labels Label Format Example - Changing Data Command String P;E2;F2 H0;o200,50;d3,ORDER NUMBER FORMAT B1;o200,100;i1;d0,13 H2;o200,350;d3,ORDER NUMBER H3;o200,400;d0,30 RE2 F1*999-999-999* F31000I5 3 Definition Places the printer in Program mode, erases current format 2, and creates a new format 2. Changes the default settings for field 0, placing the origin at 200,50, and specifying the text "ORDER NUMBER FORMAT" for the field data. Defines a bar code field at origin 200,200, enables an interpretive field, specifies that data for this field will be transmitted when the printer is in Print mode, and sets a data length of 13 characters. All other field settings are defaults. Defines a human-readable field at origin 200,350, and specifies the text "ORDER NUMBER" for the field data. All other field settings are defaults. Defines a human-readable field at origin 200,400, and specifies that data for this field will be transmitted when the printer is in Print mode. All other field settings are defaults. Places the printer in Print mode, selects format 2, and clears all previous data. Selects field 1 (the bar code field) and specifies the data to be printed in that field (*999-999-999*). Selects field 3 and specifies the value"1000" for the field data. is the syntax for the "Numeric Field Separator" command, and indicates that the value is to be incremented for each label. I is the syntax for the "Increment Value, Set" command, and sets an incrementation value of 5. is the syntax for the "Quantity Count, Set" command, and specifies that 3 labels are to be printed. prints the labels. The order numbers on these labels should be 1000, 1005, and 1010. Example Using the "Next Data Entry Field, Select" Command This example shows how to define a label with four human-readable fields. If you do not specify the field to which data is assigned, the printer automatically assigns that data to the lowest numbered field. In this example, the field is not specified, so the printer assigns the first data string to field 1, the next data string to field 2, and so on. The data strings are separated by the "Next Data Entry Field, Select" command (syntax ). Label Format Example Using Command Command String Definition P;E6;F6 H0;o100,100;d0,20 Places the printer in Program mode, erases current format 6, and creates a new format 6. Changes the default settings for field 0: places the origin at 200,50, and specifies that data for this field will be transmitted when the printer is in Print mode. All other field settings are defaults. 20 Intermec Printer Language (IPL) Developer's Guide
-
 1
1 -
2
-
3
-
4
-
5
-
6
-
7
-
8
-
9
-
10
-
11
-
12
-
13
-
14
-
15
-
16
-
17
-
18
-
19
-
20
-
21
-
22
-
23
-
24
-
 25
25 -
 26
26 -
 27
27 -
 28
28 -
 29
29 -
 30
30 -
 31
31 -
 32
32 -
 33
33 -
 34
34 -
 35
35 -
36
-
37
-
38
-
39
-
40
-
41
-
42
-
43
-
44
-
45
-
46
-
47
-
48
-
49
-
50
-
51
-
52
-
53
-
54
-
55
-
56
-
57
-
58
-
59
-
60
-
61
-
62
-
63
-
64
-
65
-
66
-
67
-
68
-
69
-
70
-
71
-
72
-
73
-
74
-
75
-
76
-
77
-
78
-
79
-
80
-
81
-
82
-
83
-
84
-
85
-
86
-
87
-
88
-
89
-
90
-
91
-
92
-
93
-
94
-
95
-
96
-
97
-
98
-
99
-
100
-
101
-
102
-
103
-
104
-
105
-
106
-
107
-
108
-
109
-
110
-
111
-
112
 |
 |
