JVC GY-DV500E Instruction Manual - Page 21
Turning the Power ON, Cassette Loading and Unloading
 |
View all JVC GY-DV500E manuals
Add to My Manuals
Save this manual to your list of manuals |
Page 21 highlights
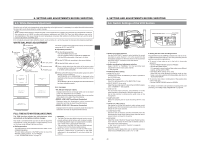
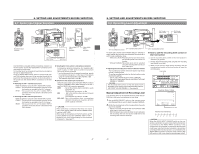
5. PREPARATIONS 5-1 Turning the Power ON FILTER 1 3200k 2 5600k 3 5600k+ND SHUTTER STATUS MENU ALARM MONITOR AUTO IRIS FULL AUTO BLACK BACK L NORMAL SPOT L STRETCH NORMAL COMPRESS LOLUX PRST A B AUTO OKFNFEE BARS CAM ON HML SAVE STBY VTR GAIN OUTPUT WHT.BAL NG POWER ON OFF OPERATE/WARNING RESET MONITOR SELECT CH-1 AUDIO CH-2 LEVEL LIGHT ON OFF COUNTER CTL TC UB AUTO IRIS FULL AUTO BLACK BACK L NORMAL SPOT L STRETCH NORMAL COMPRESS LOLUX PRST A B AUTO OKFNFEE BARS CAM ON HML SAVE STBY VTR GAIN OUTPUT WHT.BAL NG POWER ON OFF 2. 1. VTR switch POWER switch 1. Turn the POWER switch to ON. The power is then supplied to the unit. • Video image is output to the viewfinder. • The display of the VCR section is turned on. 2. Select the GY-DV500 operation mode with the VTR switch. • The GY-DV500 operation mode may differ when the power is turned ON and when the cassette is loaded depending on the setting of the VTR switch as follows: VTR switch setting SAVE GY-DV500 operation mode GY-DV500 enters the SAVE mode (tape protect mode) and stops the drum motor. "SAVE" is displayed in the VCR operation indicating section of the Status 1 mode screen in the viewfinder. In this mode, the tape is effectively protected. In this condition, press the VTR trigger button to start recording. However, it takes longer for the operation to take place from this condition than from the STBY mode. STBY When a recordable videocassette is loaded, the GY-DV500 enters the record-pause mode automatically. (The drum motor is still rotating.) "STBY" is displayed on the Status 1 screen in the viewfinder. In this condition, pressing the VTR trigger button starts recording immediately. CAUTION: Wait at least 5 seconds before turning the power ON again once it has been turned OFF. When the power is turned OFF, the unit automatically enters the tape protect mode. It takes approximately 5 seconds to enter the tape protect mode. Do not turn the power ON again within this interval. 39 5. PREPARATIONS 5-2 Cassette Loading and Unloading Cassette rear switch EJECT EJECT switch LOG REW STOP FF PLAY STILL PRST A B AUTO OKFNFEE BARS CAM ON HML SAVE STBY VTR GAIN OUTPUT WHT.BAL NG POWER ON OFF Videocassette VTR switch POWER switch Cassette cover • A cassette cannot be loaded or unloaded while the GY-DV500 is in POWER OFF mode. • Use a videocassette tape marked MiniDV. • The videocassette should be held vertical and inserted straight into the slot. Loading the Cassette 1. Set the POWER switch to ON. 2. Slide the EJECT switch to the side to open the cassette cover. 3. Insert a videocassette into the cassette slot after removing the tape slack. Ensure that the videocassette is fully inserted. The cassette indicator on the display blinks during tape loading and lights steadily after the loading has been completed. 4. Slowly close the cassette cover by pushing it in all the way. When the cassette cover is closed, the OPERATE LED lights up green and the unit is in the condition where it can be operated. In the SAVE mode, the OPERATE LED lights orange. • The condition at the completion of loading varies depending on the position of the VTR switch and the switch on the back of the videocassette as shown below. VTR switch Switch on Back of Videocassette REC SAVE STBY SAVE Enters recordpause mode after back-spacing. The unit enters stop mode. "REC INH" is In the record-pause displayed for a few mode and the drum seconds on the rotation is stopped. counter display. * Recording can be started by pressing the VTR trigger button from the record-pause condition. For details, see page 50 "Basic Record-ing Operation". After the cassette cover is closed, it takes about 8 seconds before the unit can start recording or before it enters the stop mode. CAUTION: The GY-DV500 cannot be operated while the cassette cover is open. Make sure to close the cover before operating the unit. Unloading the Cassette 1. Set the POWER switch to ON. 2. Slide the EJECT switch all the way to the side to start tape ejection. The cassette indicator on the display blinks during tape ejection and turns off after the ejection has been completed. • It takes a few seconds before the cassette is ejected after the EJECT switch is moved. 3. Take out the videocassette. 4. Close the cassette cover. CAUTION: Do not leave the unit for a long period with the cassette cover open as dirt or other foreign objects may enter the VCR section and cause malfunction. 40
-
 1
1 -
2
-
3
-
4
-
5
-
6
-
7
-
8
-
9
-
10
-
11
-
12
-
13
-
14
-
15
-
 16
16 -
 17
17 -
 18
18 -
 19
19 -
 20
20 -
 21
21 -
 22
22 -
 23
23 -
 24
24 -
 25
25 -
 26
26 -
27
-
28
-
29
-
30
-
31
-
32
-
33
-
34
-
35
-
36
-
37
-
38
-
39
-
40
-
41
-
42
-
43
-
44
-
45
-
46
-
47
-
48
 |
 |
