JVC GY-DV500E Instruction Manual - Page 39
Advanced Process Screen, Skin Color Adjust, Screen
 |
View all JVC GY-DV500E manuals
Add to My Manuals
Save this manual to your list of manuals |
Page 39 highlights
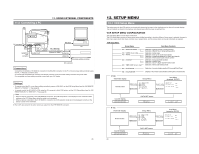
12-7 ADVANCED PROCESS Screen 12. SETUP MENU Item COLOR MATRIX Function, Operation Variation Range Initial Setting Sets the color matrix ON ON OFF ...... Deactivates the color matrix function OFF ON ....... The color reproducibility is enhanced, but noise increases. CAUTION: During the LOLUX operation, COLOR MATRIX is fixed to the OFF setting and "FIX" is displayed. GAMMA Correction of the gamma curve to decide the reproducibility of black color. • To enhance the black color reproducibility. However, halftones will be lost for white section Increase the number • When reproducibility of the black color is not so important Decrease the number CAUTION: • During LOLUX operation, "FIX" is displayed because GAMMA is fixed at the MIN value. MAX (8) 7 17 gradations to NORMAL (0) to -7 MIN (-8) NORMAL SKIN COLOR Pressing the SHUTTER dial once when the cursor is at this position ADJUST switches the screen to display the SKIN COLOR ADJUST screen. PAGE BACK The PROCESS MENU returns when the SHUTTER dial is pressed with - - the cursor at this position. 12-8 SKIN COLOR ADJUST Screen Item Function, Operation Variation Range Initial Setting SKIN COLOR DETECT Sets whether it is possible to change the color used by the Skin Detail function. EXECUTE ...... Choose this setting to allow detection of the color used by the Skin Detail function. STOP Choose this setting to stop detection of the color used by the Skin Detail function. See "Using the Skin Detail Function" on page 84. STOP EXECUTE STOP SKIN COLOR RANGE The setting of this item can only be changed when the SKIN COLOR DETECT item is set to EXECUTE. This setting is for adjusting the skin color range where Skin Detail functions. (When this item is selected, the area where the Skin Detail function is applicable is indicated by zebra patterns on the screen.) While viewing the zebra pattern range, perform the adjustment. Increasing the range ........ Increase the number Increasing the range . ...... Decrease the number WIDE +19 (33 gradations) to NORMAL to -11 NARROW NORMAL PAGE BACK The ADVANCED PROCESS MENU returns when the SHUTTER dial is - - pressed with the cursor at this position. For servicing → See the service manual page 1-17 "1.12 CHANGING THE COLOR MATRIX SETTING". 75 12. SETUP MENU 12-9 FILE MANAGE Screen The unit has three files that can be used for storing camera menus. The FILE MANAGE screen is for performing the operations for saving the set CAMERA MENU. • When menu settings are made using SCENE FILE A or B, the contents of the settings will be invalid if the storage operations are not performed on this screen. However, the SETUP MENU settings will be valid even if the storage operations are not performed. • When menu settings are made using SCENE FILE OFF, the contents are stored in the unit at the time settings are changed on each menu screen even if the storage operations are not performed. FILTER 1 3200k 2 5600k 3 5600k+ND SHUTTER STATUS MENU ALARM MONITOR AUTO IRIS FULL AUTO BLACK BACK L NORMAL SPOT L STRETCH NORMAL COMPRESS LOLUX PRST A B ON KNEE OFF AUTO BARS CAM HML SAVE STBY VTR GAIN OUTPUT WHT.BAL NG POWER ON OFF OPERATE/WARNING RESET MONITOR SELECT CH-1 AUDIO CH-2 LEVEL LIGHT ON OFF COUNTER CTL TC UB 2. 3. 4. 5. SHUTTER dial 1. STATUS button SHUTTER MENU Cursor - - - CAMERA MENU - - - SCENE F I LE :A VF D I SP L AY MENU OPERAT I ON MENU PROCESS MENU F I L E MANAGE SETUP MENU EX I T Cursor CAMERA MENU screen - - - F I L E MANAGE - - - SCENE F I LE A STORE F I L E :A S TORE RESET F I LE : OFF RESET PAGE BACK STORE OK ? FILE MANAGE screen Storage Operation 1. Press the STATUS button for about 1 second to display the CAMERA MENU screen. 2. Turn the SHUTTER dial to align the cursor with the FILE MANAGE item, and then press the SHUTTER dial in the direction of the arrow. • The FILE MANAGE screen appears in the viewfinder. 3. Choose the file to save in (A or B). 1 Turn the SHUTTER dial to select the STORE FILE item, and then press the SHUTTER dial in the direction of the arrow. 2 Turn the SHUTTER dial to select the file to save in (A or B), and then press the SHUTTER dial in the direction of the arrow. 4. Save the menu settings. Turn the SHUTTER dial to align the cursor with the STORE item, and then press the SHUTTER dial in the direction of the arrow. • The "STORE OK?" message appears in the lower section of the centre of the screen. When the SHUTTER dial is pressed in the direction of the arrow once more, the menu settings are stored in the selected STORE FILE. 5. Close the FILE MANAGE screen Turn the SHUTTER dial to align the cursor with PAGE BACK, and then press the SHUTTER dial in the direction of the arrow. • The CAMERA MENU screen returns in the viewfinder. Memo: • When changing the menu settings in SCENE FILE A and saving in STORE FILE B: SCENE FILE B: The contents become the menu contents of the changed settings. SCENE FILE A: The contents become the menu contents valid before the settings were changed. • When changing the menu settings in SCENE FILE OFF and saving in STORE FILE B: SCENE FILE B: The contents become the menu contents of the changed settings. SCENE FILE OFF: The contents become the menu contents of the changed settings. Resetting the menu settings to the initial settings is also done using the FILE MANAGE screen. See "Resetting the Camera Menu Settings" on page 78. 76
-
 1
1 -
2
-
3
-
4
-
5
-
6
-
7
-
8
-
9
-
10
-
11
-
12
-
13
-
14
-
15
-
16
-
17
-
18
-
19
-
20
-
21
-
22
-
23
-
24
-
25
-
26
-
27
-
28
-
29
-
30
-
31
-
32
-
33
-
 34
34 -
 35
35 -
 36
36 -
 37
37 -
 38
38 -
 39
39 -
 40
40 -
 41
41 -
 42
42 -
 43
43 -
 44
44 -
45
-
46
-
47
-
48
 |
 |
