JVC GY-HM170U Instruction Manual - Page 174
Blinking of the Tally Lamp, Warning Tone, Troubleshooting
 |
View all JVC GY-HM170U manuals
Add to My Manuals
Save this manual to your list of manuals |
Page 174 highlights
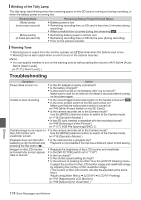
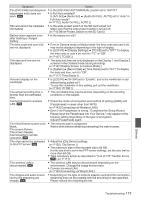
Blinking of the Tally Lamp The tally lamp start blinking when the remaining space on the SD card is running out during recording, or when the battery power is running low. Blinking Mode Blinks slowly (once every second) Blinks quickly (2 times per second) Remaining Battery Power/SD Card Space 0 Battery power is low 0 Remaining recording time on SD card is less than 3 minutes (during recording) 0 When a malfunction occurred during live streaming K 0 Remaining battery power is almost zero 0 Remaining recording time on SD card is zero (during recording) 0 Error on the camera recorder Warning Tone 0 Warning tone is output from the monitor speaker and [x] terminal when the battery level is low. 0 Warning tone is also output when an error occurs in the camera recorder. Memo : 0 You can specify whether to turn on the warning tone as well as setting the volume in [A/V Set] B [Audio Set] B [Alarm Level]. (A P112 [ Alarm Level ] ) Troubleshooting Symptom Action Power does not turn on. 0 Is the AC adapter properly connected? 0 Is the battery charged? 0 Is the power turned on immediately after it is turned off? Make sure to wait for an interval of at least 5 seconds before turning on the power again. Unable to start recording. 0 Is the record trigger button/lock switch on the handle turned on? O 0 Is the write-protect switch of the SD card turned on? Make sure that the write-protect switch is turned off. (A P40 [Write-Protect Switch on the SD Card] ) 0 Is the camera recorder set to the Camera mode? Use the [MODE] selection button to switch to the Camera mode. (A P18 [Operation Modes] ) 0 Is the SD card inserted compatible with the recording format? (A P48 [Selecting a Video Format] ) (A P117 [ 4GB File Spanning(SDXC) ] ) Camera image is not output on 0 Is the camera recorder set to the Camera mode? the LCD monitor and Use the [MODE] selection button to switch to the Camera mode. viewfinder screen. (A P18 [Operation Modes] ) Playback does not start after 0 Is the selected clip a playable clip? selecting a clip thumbnail and Playback is not possible if the clip has a different video format setting. pressing the Set button (R). Images on the LCD monitor 0 Readjust the brightness of the LCD monitor and viewfinder. and viewfinder screen appear 0 Is the [ND FILTER] switch set to "1/16"? dark or blurred. 0 Is the iris closed? 0 Is the shutter speed setting too high? 0 Is the amount of peaking too little? Use the [LCD/VF Peaking] menu to adjust the contour for the LCD monitor image and viewfinder image by adjusting the contour of the viewfinder image. (The contour of the LCD monitor will also be adjusted at the same time.) Adjust using [Main Menu] B [LCD/VF] B [LCD/VF Peaking]. (A P37 [Adjusting the LCD Monitor] ) (A P38 [Adjusting the Viewfinder] ) Others 174 Error Messages and Actions
-
 1
1 -
2
-
3
-
4
-
5
-
6
-
7
-
8
-
9
-
10
-
11
-
12
-
13
-
14
-
15
-
16
-
17
-
18
-
19
-
20
-
21
-
22
-
23
-
24
-
25
-
26
-
27
-
28
-
29
-
30
-
31
-
32
-
33
-
34
-
35
-
36
-
37
-
38
-
39
-
40
-
41
-
42
-
43
-
44
-
45
-
46
-
47
-
48
-
49
-
50
-
51
-
52
-
53
-
54
-
55
-
56
-
57
-
58
-
59
-
60
-
61
-
62
-
63
-
64
-
65
-
66
-
67
-
68
-
69
-
70
-
71
-
72
-
73
-
74
-
75
-
76
-
77
-
78
-
79
-
80
-
81
-
82
-
83
-
84
-
85
-
86
-
87
-
88
-
89
-
90
-
91
-
92
-
93
-
94
-
95
-
96
-
97
-
98
-
99
-
100
-
101
-
102
-
103
-
104
-
105
-
106
-
107
-
108
-
109
-
110
-
111
-
112
-
113
-
114
-
115
-
116
-
117
-
118
-
119
-
120
-
121
-
122
-
123
-
124
-
125
-
126
-
127
-
128
-
129
-
130
-
131
-
132
-
133
-
134
-
135
-
136
-
137
-
138
-
139
-
140
-
141
-
142
-
143
-
144
-
145
-
146
-
147
-
148
-
149
-
150
-
151
-
152
-
153
-
154
-
155
-
156
-
157
-
158
-
159
-
160
-
161
-
162
-
163
-
164
-
165
-
166
-
167
-
168
-
 169
169 -
 170
170 -
 171
171 -
 172
172 -
 173
173 -
 174
174 -
 175
175 -
 176
176 -
 177
177 -
 178
178 -
 179
179 -
180
-
181
-
182
-
183
-
184
 |
 |
