JVC GY-HM170U Instruction Manual - Page 27
Preparations, Settings and Adjustments Before Use, Attaching the Handle Unit, Adjusting the Grip Belt
 |
View all JVC GY-HM170U manuals
Add to My Manuals
Save this manual to your list of manuals |
Page 27 highlights
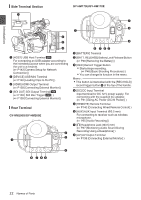
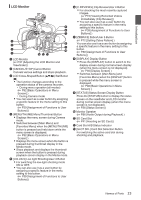
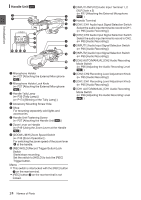
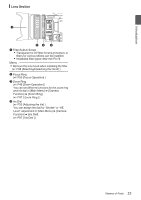
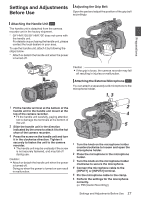
Preparations Settings and Adjustments Before Use Adjusting the Grip Belt Open the pad and adjust the position of the grip belt accordingly. . Attaching the Handle Unit K The handle unit is detached from the camera recorder unit in the factory shipment. * GY-HM170U/GY-HM170E does not come with the handle unit. For details on purchasing the handle unit, please contact the local dealers in your area. To use the handle unit, attach it by following the steps below. * Attach or detach the handle unit when the power is turned off. . Caution : 0 If the grip is loose, the camera recorder may fall off resulting in injuries or malfunction. Attaching the External Microphone O You can attach a separately sold microphone to the microphone holder. 1, 3 . 1 Fit the handle terminal at the bottom of the handle unit to the handle unit mount at the top of the camera recorder. 0 Fit the handle unit carefully, paying attention not to damage the terminals at the bottom of the unit. 2 Slide the handle unit in the direction indicated by the arrow to attach it to the hot shoe of the camera recorder. 3 Press the screw on the handle unit and turn it in the clockwise direction. Tighten it securely to fasten the unit to the camera recorder. 0 The handle unit may be unsteady if the screw is not securely fastened, and may fall off during use. Caution : 0 Attach or detach the handle unit when the power is turned off. Doing so when the power is turned on can result in malfunction. 2 4 5 . 1 Turn the knob on the microphone holder counterclockwise to loosen and open the microphone holder. 2 Place the microphone in the microphone holder. 3 Turn the knob on the microphone holder clockwise to secure the microphone. 4 Connect the microphone cable to the [INPUT1] or [INPUT2] terminal. 5 Pin the microphone cable to the clamp. 6 Perform the settings for the microphone correctly. (A P65 [Audio Recording] ) Settings and Adjustments Before Use 27
-
 1
1 -
2
-
3
-
4
-
5
-
6
-
7
-
8
-
9
-
10
-
11
-
12
-
13
-
14
-
15
-
16
-
17
-
18
-
19
-
20
-
21
-
 22
22 -
 23
23 -
 24
24 -
 25
25 -
 26
26 -
 27
27 -
 28
28 -
 29
29 -
 30
30 -
 31
31 -
 32
32 -
33
-
34
-
35
-
36
-
37
-
38
-
39
-
40
-
41
-
42
-
43
-
44
-
45
-
46
-
47
-
48
-
49
-
50
-
51
-
52
-
53
-
54
-
55
-
56
-
57
-
58
-
59
-
60
-
61
-
62
-
63
-
64
-
65
-
66
-
67
-
68
-
69
-
70
-
71
-
72
-
73
-
74
-
75
-
76
-
77
-
78
-
79
-
80
-
81
-
82
-
83
-
84
-
85
-
86
-
87
-
88
-
89
-
90
-
91
-
92
-
93
-
94
-
95
-
96
-
97
-
98
-
99
-
100
-
101
-
102
-
103
-
104
-
105
-
106
-
107
-
108
-
109
-
110
-
111
-
112
-
113
-
114
-
115
-
116
-
117
-
118
-
119
-
120
-
121
-
122
-
123
-
124
-
125
-
126
-
127
-
128
-
129
-
130
-
131
-
132
-
133
-
134
-
135
-
136
-
137
-
138
-
139
-
140
-
141
-
142
-
143
-
144
-
145
-
146
-
147
-
148
-
149
-
150
-
151
-
152
-
153
-
154
-
155
-
156
-
157
-
158
-
159
-
160
-
161
-
162
-
163
-
164
-
165
-
166
-
167
-
168
-
169
-
170
-
171
-
172
-
173
-
174
-
175
-
176
-
177
-
178
-
179
-
180
-
181
-
182
-
183
-
184
 |
 |
