JVC KW-M560BT Instruction Manual America - Page 39
Display Setup, Change background image
 |
View all JVC KW-M560BT manuals
Add to My Manuals
Save this manual to your list of manuals |
Page 39 highlights
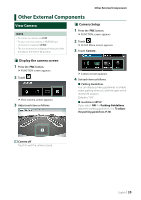
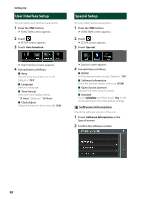
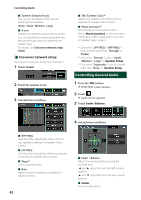
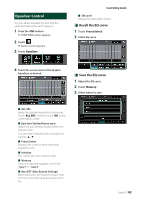
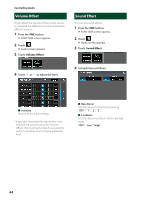
Display Setup 1 Press the [FNC] button. hhFUNCTION screen appears. 2 Touch [ ]. hhSETUP screen appears. 3 Touch [Display]. Setting Up To register original image You can load an image from the connected USB device and set it for the background image. Before operating this procedure, it is necessary to connect the device which has the image to load. 1 Touch [User1 Select] or [User2 Select] in the Background screen. 2 Select the image to load. hhDisplay screen appears. 4 Set each item as follows. ■■ [Dimmer] Select dimmer mode. [OFF]: The display and buttons do not dim. [ON]: The display and buttons dim. [SYNC] (Default): Turns the dimmer function on or off when the vehicle light control switch is turned on or off. ■■[OSD Clock] Select if you want to display the clock while the screen is off, or while watching video files on USB, etc. "[ON]" (Default)/"[OFF]" ■■[Screen Adjust] Displays the Screen Adjust screen. (P.37) ■■ [Background] Changing background image. (P.39) ÑÑChange background image 1 Touch [Background] in the Display screen. 2 Select an image. 3 Touch [Enter]. hhThe selected image is loaded and the display returns to the Background screen. NOTE • Touching [ ] rotates counter clockwise. • Touching [ ] rotates clockwise. • Picture files: JPEG (.jpg, .jpeg), PNG (.png), BMP (.bmp) *1 *1 Select an original image in advance. English 39
-
 1
1 -
2
-
3
-
4
-
5
-
6
-
7
-
8
-
9
-
10
-
11
-
12
-
13
-
14
-
15
-
16
-
17
-
18
-
19
-
20
-
21
-
22
-
23
-
24
-
25
-
26
-
27
-
28
-
29
-
30
-
31
-
32
-
33
-
 34
34 -
 35
35 -
 36
36 -
 37
37 -
 38
38 -
 39
39 -
 40
40 -
 41
41 -
 42
42 -
 43
43 -
 44
44 -
45
-
46
-
47
-
48
-
49
-
50
-
51
-
52
-
53
-
54
-
55
-
56
-
57
-
58
-
59
-
60
-
61
-
62
 |
 |
